All Categories
Featured
Table of Contents
- – OCRV Center
- – What Makes Custom RV Paint Jobs Near Me the To...
- – Understanding Full Body Repaint RV vs Partial...
- – Benefits of Comprehensive Exterior Work
- – When Partial Repairs Make Sense
- – How Much Does a Full Body RV Paint Job Cost in...
- – Cost Breakdown by Motorhome Class and Size
- – Class A Motorhomes ($10,000–$20,000+)
- – Class C and Smaller Units ($5,000–$12,000)
- – Factors Influencing Pricing
- – Prep Work and Fiberglass Repairs
- – Custom Designs and Graphics Add-Ons
- – Insurance Claim Handling for Paint Repairs
- – What Is the Step-by-Step Process for Professio...
- – Initial Assessment and Color Matching
- – Advanced Systems for Factory Accuracy
- – Surface Preparation and Priming
- – Addressing Common Damage Types
- – Application and Curing in Controlled Environm...
- – Heated Booth Advantages
- – Final Inspection and Protection Layers
- – Why Choose Experts for Custom RV Paint Jobs Ne...
- – Key Differentiators in Quality and Service
- – Certifications and Affiliations
- – Satisfaction Guarantee Details
- – Real Results from Motorhome Owners
- – Common Concerns About Custom RV Paint Jobs Nea...
- – Concern: Will the Finish Last in Harsh Condit...
- – Solutions with UV Protection and Quality Mat...
- – Concern: How Disruptive Is the Timeline?
- – Efficient Scheduling and Turnaround Expectat...
- – Concern: Matching Original or Custom Colors A...
- – We Can Help! Contact Us Today
- – Frequently Asked Questions About Custom RV Pai...
- – OCRV Center
Many California motorhome owners regularly seek custom RV paint jobs near me whenever the exterior of their unit starts revealing damage caused by persistent sunlight, breezes, road particles, and seasonal shifts. Faded gelcoat, chalky surfaces, peeling decals, and mismatched repairs diminish appearance and enjoyment during trips. Such problems commonly result from extended ultraviolet rays degrading color molecules, causing chalking and diminished brightness. Lots of owners detect the change over time, commencing with minor fading that later influences complete exterior presence and driving confidence. Tackling it via skilled RV exterior refurbishment brings back aesthetics and safeguards against future deterioration.
The best RV repair services for motorhomes in California emphasize comprehensive approaches that combine expert preparation, durable materials, and precise application to deliver long-lasting results. Services focus on full body repaint RV options that cover entire surfaces for uniform protection or targeted fixes for isolated damage. These methods stress high standards to stop ongoing troubles including bubbling, fractures, or uneven blending that budget or quick services frequently create. Owners profit from procedures featuring UV resistant coatings and sealing layers, significantly increasing finish durability. Skilled execution upholds structural soundness while boosting appearance, resulting in a motorhome that appears renewed and set for travel. Providers also facilitate custom graphics incorporation, permitting customization that expresses unique preferences without affecting usability. To learn about complete RV maintenance, check the RV repair overview.
What Makes Custom RV Paint Jobs Near Me the Top Choice for Motorhome Restoration?
Custom RV paint jobs near me stand out as a leading solution for motorhome owners seeking reliable RV exterior restoration because they address both cosmetic and protective needs through skilled techniques and premium materials. Work commences with in-depth assessments to uncover concealed concerns including oxidation or fiberglass compromise, assuring a strong foundation for impeccable results. Such methods avoid subsequent problems that budget options commonly miss. Owners feel reassured understanding the treatment endures California's harsh surroundings, ranging from seaside salt exposure to desert temperatures. Data reveals expert repaints often add years to finish lifespan and increase resale desirability.
Understanding Full Body Repaint RV vs Partial Touch-Ups
A full body repaint RV entails total exterior treatment, proving necessary for widespread fading, numerous scratches/chips, or prior repairs displaying clear lines and shade differences. The procedure eliminates prior layers entirely, uses superior primers, and constructs several base and protective coats for even depth and toughness.
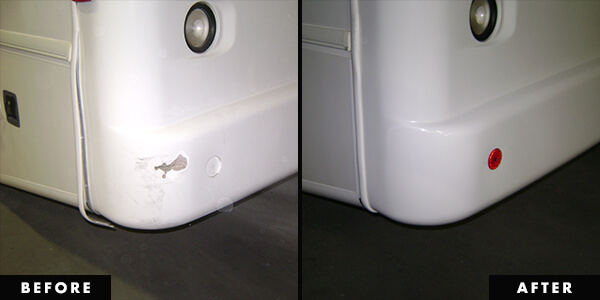
Partial touch-ups concentrate on isolated damage, blending new material into surrounding areas to minimize visibility of the repair zone. These options perform effectively for limited damage like pebble marks or spot fading, offering faster turnaround and lower expense while upholding structural wholeness.
Full-body repaints ensure fluid color flow and comprehensive defense, reducing possibilities of subsequent lifting or inconsistent aging. Localized corrections keep expenses manageable for owners facing contained issues, supplying a reasonable balance that substantially upgrades aesthetics and endurance.
Benefits of Comprehensive Exterior Work
Comprehensive treatments deliver even color application across all panels, eliminating weak spots that partial fixes sometimes leave behind. These include complete UV resistant coatings coverage, delivering optimal protection from ultraviolet exposure. Owners often notice a substantial increase in visual impact and confidence when their motorhome appears refreshed and well-maintained.
When Partial Repairs Make Sense
Targeted repairs suit owners dealing with contained damage that remains limited to specific areas. They permit precise addressing without the effort and expense of total disassembly. With expert execution, such repairs merge seamlessly and prolong current coating lifespan considerably.
This variety of choices enables owners to obtain exceptional outcomes customized to their unique needs. Reach out for a complimentary consultation to identify the best restoration approach. Learn about related body and collision options on the RV collision repair services page.
How Much Does a Full Body RV Paint Job Cost in California?
Knowing the full body RV paint job cost in California empowers owners to plan effectively for custom RV paint jobs near me while avoiding budget shocks. Pricing reflects factors like motorhome dimensions, the degree of existing damage, the grade of materials selected, and any additional custom elements such as graphics or specialty finishes. Transparent breakdowns enable informed choices that balance upfront costs with long-term resilience and resale benefits. Local figures account for elevated labor and supply costs in California versus other regions.
Cost Breakdown by Motorhome Class and Size
Class A motorhomes, due to their expansive surface area, commonly range from $10,000 to $20,000 or higher for complete projects that encompass full stripping, priming, multi-coat painting, and final protection layers. Smaller Class C units and trailers commonly land between $5,000 and $12,000 according to required work level. Partial or sectional projects often begin around $2,000 to $6,000 when focusing on limited zones. These figures incorporate premium automotive-grade paints and skilled labor performed in controlled environments that ensure consistent quality and value alignment.
Class A Motorhomes ($10,000–$20,000+)
The expansive size of Class A models necessitates increased materials and additional application duration. Comprehensive coverage justifies the higher investment through enhanced protection and noticeable improvement in resale appeal for premium models.
Class C and Smaller Units ($5,000–$12,000)
Compact units enjoy adjusted pricing that maintains the same quality levels for prep and completion. This strategy offers superior value with matching endurance and appearance enhancements.
Factors Influencing Pricing
Extensive preparation, particularly fiberglass repairs for cracks, delamination, or structural weaknesses, raises the total when underlying issues require attention before painting. Custom designs and graphics contribute additional expense due to the specialized labor needed for precise pattern creation and application. The choice of high-performance UV resistant coatings and multi-layer clear systems adds to the cost but provides superior fade resistance and gloss retention. Intricate color shifts or matching unusual original shades may modestly impact the overall cost.
Prep Work and Fiberglass Repairs
Thorough prep corrects concealed issues including moisture damage or collision stress areas. This base work stops later delamination or fractures that might damage the fresh coating.
Custom Designs and Graphics Add-Ons
Personalized elements require careful design planning and skilled execution to integrate smoothly (Custom Rv Paint Jobs La Habra). These features generate standout styles that mirror individual choices and improve total appearance
Insurance Claim Handling for Paint Repairs
Plenty of policies protect exterior harm from crashes, hail events, or harsh weather through comprehensive coverage. Skilled providers handle claims smoothly, supplying thorough paperwork, images, and estimates for adjuster evaluation. Such handling often lowers owner out-of-pocket expenses considerably. Initial policy check reveals included items and speeds up approval schedules.
Transparent estimates combined with professional support make budgeting straightforward. Get in touch for a complimentary customized estimate for your motorhome. Explore collision-related services through the RV collision repair guide.
What Is the Step-by-Step Process for Professional RV Painting?
Professional RV painting adheres to a precise, multi-stage process designed to produce durable, attractive finishes capable of withstanding constant exposure and heavy use. Each step builds upon the previous one, addressing potential weaknesses early and ensuring the final result meets or exceeds expectations. This methodical approach separates excellent results from quick methods that frequently deteriorate early.

Initial Assessment and Color Matching
Experts conduct thorough examinations to assess damage scope and select appropriate materials and methods. Modern systems deliver factory color match RV exactness via scanning and mixing tools that recreate original colors faithfully. This avoids noticeable variations and preserves original character. Thorough documentation details range, anticipated issues, and proposed methods, offering owners full understanding of the planned project.
Advanced Systems for Factory Accuracy
Spectrophotometers gather paint data for accurate matching regardless of manufacturer. This system avoids trial-and-error and creates matches that merge flawlessly with remaining factory paint.
Surface Preparation and Priming
Complete surfaces experience sanding, cleaning, and superior priming to set up perfect bonding bases. This stage corrects oxidation, removes contaminants, and fills minor imperfections to create a smooth, stable base. Correct prep removes typical failure causes like blistering, separation, or irregular texture in the completed finish. Multiple grit progressions ensure the surface meets exact standards before moving forward.
Addressing Common Damage Types
Oxidation removal restores the substrate to a sound condition. Fiberglass work seals openings and bolsters vulnerable spots. Thorough preparation promotes bonding and stops repeated problems.
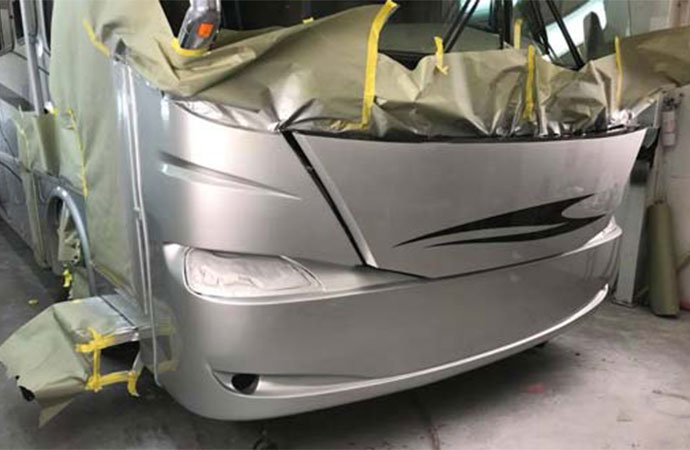
Application and Curing in Controlled Environments
Initial coats apply in temperature-controlled downdraft booths that manage heat, moisture, and dust for even application and faster curing. Custom Rv Paint Jobs La Habra. Several layers with managed flash intervals create thickness and richness without sagging or texture defects. Managed environments generate uniform hardness and shine throughout surfaces. This setup substantially lowers defects compared to open-air methods
Heated Booth Advantages
Booths remove particles and pollutants while encouraging uniform drying. This results in harder, more resistant finishes with superior longevity and appearance.
Final Inspection and Protection Layers
Professionals carry out several inspections across phases to ensure uniformity, color match, and defect absence before UV resistant coatings and sealing clear layers. Compounding and polishing produce professional, high-gloss finishes. These final phases secure defense and increase richness for lasting professional aesthetics.
This rigorous process yields consistent, high-quality outcomes. Contact us for a complimentary process overview. Explore related fiberglass options on the RV fiberglass repair page.
Why Choose Experts for Custom RV Paint Jobs Near Me in Southern California?
Experts in custom RV paint jobs near me in Southern California stand apart via recognized certifications, polished methods, and steadfast dedication to owner satisfaction. These attributes guarantee work performed to elevated standards that consistently meet or surpass owner expectations.
Key Differentiators in Quality and Service
Certifications validate technician skill in cutting-edge paint application, safety procedures, and repair methods. Satisfaction guarantees provide assurance that workmanship issues will be resolved promptly. Links to superior suppliers secure availability of best materials and regular training.
Certifications and Affiliations
Recognized certifications demonstrate ongoing commitment to best practices. Partnerships with top suppliers provide entry to advanced materials and training opportunities.
Satisfaction Guarantee Details
Guarantees address defects or concerns, providing rework, modifications, or solutions. This guarantee bolsters trust in the provided quality.
Real Results from Motorhome Owners
A Class A owner in Orange County reported, "The results went beyond expectations and significantly enhanced resale confidence". Another owner from Fullerton said, "Expert coordination made the insurance process seamless and worry-free throughout". A third from Irvine mentioned, "The custom graphics transformed my older motorhome into something exceptionally unique".
Consistent positive outcomes build lasting confidence. Reach out for a complimentary assessment. Check more customer stories on the testimonials page.
Common Concerns About Custom RV Paint Jobs Near Me and How Experts Solve Them
Many owners considering custom RV paint jobs near me express valid concerns regarding finish durability, project timeline impact, color matching precision, and overall value. Professional services tackle these via clear methods, cutting-edge tools, and reliable systems that focus on enduring satisfaction.
Concern: Will the Finish Last in Harsh Conditions?
UV resistant coatings along with premium base layers robustly fight fading, chalking, and oxidation due to long sun exposure. Durable layered applications endure coastal salt, highway particles, and temperature swings typical in California. Owners generally observe minimal wear even after extended heavy usage periods.
Solutions with UV Protection and Quality Materials
Specialized inhibitors reflect damaging rays while flexible clear coats accommodate expansion and contraction. Marine-grade formulations add extra resilience against moisture and contaminants.
Concern: How Disruptive Is the Timeline?
Structured scheduling confines most projects to 2–6 weeks, depending on scope. Frequent progress updates keep owners informed and allow planning around travel or storage needs. Streamlined processes prevent avoidable delays while maintaining excellence.
Efficient Scheduling and Turnaround Expectations
Sequential planning emphasizes essential steps without acceleration. Electronic monitoring offers immediate progress views. This system respects owner timeframes and minimizes worry.
Concern: Matching Original or Custom Colors Accurately?
Precise color-matching equipment captures and recreates existing hues with great fidelity, even on aged or weathered materials. Sophisticated mixing technology ensures smooth blending with existing original areas. This precision maintains original aesthetics or accomplishes intended custom designs consistently.
Addressing these concerns directly builds assurance. Get in touch for a complimentary conversation on your requirements. For roof-related issues, check RV roof repair services.
We Can Help! Contact Us Today
Owners prepared to pursue custom RV paint jobs near me find that selecting the appropriate service converts uncertainty into assured satisfaction. Clear methods and firm guarantees clear hurdles while delivering outcomes that go beyond anticipated results.
Motorhome owners looking for dependable solutions find OCRV Center provides consistent, high-value outcomes via expert custom RV paint jobs near me and exterior restoration. Located at 23281 La Palma Ave. Yorba Linda CA 92887, call (714) 909-1444 for your consultation. Pride reappears as the rig appears striking and feels revitalized on every outing – that emotional uplift from renewed appearance improves journey enjoyment. Logically, it secures investment by preventing additional damage, enhancing resale value substantially, and offering enduring protection that supports the cost. With more than 30 years of combined team expertise, certifications, and satisfaction guarantee, results show consistency and worth. Whether for full-time travel, family trips, or weekend getaways, quality restoration meets requirements reliably. Make the move toward a confident, road-ready motorhome. Further information is accessible on the main site, contact page, and RV paint shop page.
Frequently Asked Questions About Custom RV Paint Jobs Near Me
How long does a custom RV paint job take?
Timelines depend on project scope and complexity. Partial touch-ups often finish in 1–2 weeks, while full body repaints typically span 2–6 weeks to accommodate proper curing and detailing stages. Factors include booth availability, custom additions, and environmental conditions. Efficient shops prioritize clear communication and structured planning to minimize inconvenience. Owners value knowing realistic timelines upfront for better planning. See more on the RV paint shop process. (110 words)
Does insurance cover RV exterior restoration?
Coverage depends on the specific policy, but many comprehensive plans include damage from accidents, hail, or severe weather. Experienced shops assist with claims by preparing documentation, photographs, and estimates for adjuster review. This coordination frequently reduces out-of-pocket costs. Early policy review clarifies what qualifies. Professional support simplifies the entire procedure. Learn about related claims on RV collision repair. (105 words)
What is the best paint for RV exteriors in California?
Automotive-grade paints featuring built-in UV resistant coatings (Custom Rv Paint Jobs La Habra) offer superior performance against California's strong sunlight. Multi-layer applications with clear coats deliver excellent gloss, adhesion, and resistance to cracking or peeling. These outperform standard alternatives in fade prevention and longevity. Factory-spec matching maintains consistent appearance. Explore paint options on RV paint shop services. (100 words)
Can custom graphics be added during restoration?
Custom graphics integrate during the painting process, allowing stripes, logos, or airbrush artwork that personalizes the motorhome. Application methods prevent bubbling, peeling, or fading. Designs accommodate different styles while preserving aerodynamics. This addition creates distinctive visual appeal. See graphic examples on photos gallery. (85 words)
How do I get started with local custom RV paint jobs near me experts?
Begin with an initial assessment to evaluate damage and discuss objectives. Submit photos or details for preliminary recommendations. Experts explain available options, timelines, and estimates. This step provides clarity without obligation. Start your process on contact page. (75 words)
What causes RV paint to fade?
Extended UV exposure degrades pigments, resulting in chalking and color loss. Oxidation from environmental elements speeds deterioration. Road debris and improper cleaning accelerate wear. Protective measures reduce these effects. Learn prevention tips on RV maintenance page. (70 words)
Is full body repaint worth it over partial fixes?
Extensive fading or widespread damage benefits from full repaints that provide uniform, long-lasting results. Partial fixes address isolated issues but may show transitions later. Comprehensive work maximizes overall value and appearance. Compare options on RV body shop. (80 words)
How does prep work affect the final finish?
Thorough sanding, cleaning, and priming establish smooth adhesion surfaces. Insufficient preparation causes peeling or uneven texture. Quality prep guarantees even coverage and extended durability. Details on RV paint shop. (70 words)
What maintenance follows a new paint job?
Gentle washing removes contaminants and preserves shine. Waxing or sealants provide additional barriers. Avoid harsh chemicals. Regular care prolongs finish life significantly. See maintenance advice on RV maintenance. (70 words)
Can older motorhomes get modern custom looks?
Modern updates allow contemporary patterns or refreshed schemes on vintage models. Advanced materials improve durability alongside aesthetics. This revitalizes appearance effectively. Explore remodel ideas on RV remodel services. (70 words)
OCRV Center
Address: 23281 La Palma Ave Yorba Linda, CA 92887Phone: (714) 909-1444
Email: art@ocrvcenter.com
OCRV Center
Rv Painting La Habra, CA
Rv Painting La Habra, CA
Custom Rv Paint La Habra, CA
Motorhome Paint Repair La Habra, CA
Rv Paint Shop Near Me La Habra, CA
Paint Rv La Habra, CA
Rv Painter La Habra, CA
Rv Painting La Habra, CA
Paint Fiberglass Rv La Habra, CA
Rv Paint Repair La Habra, CA
Painting Rv La Habra, CA
Motorhome Custom Paint La Habra, CA
Painting An Rv La Habra, CA
Rv Exterior Paint La Habra, CA
Rv Paint Job La Habra, CA
Custom Rv Paint La Habra, CA
Motorhome Paint Shops La Habra, CA
Rv Exterior Paint La Habra, CA
Rv Painting La Habra, CA
Painting Rv La Habra, CA
Motorhome Painting Near Me La Habra, CA
Custom Painted Motorhomes La Habra, CA
Painting An Rv La Habra, CA
Custom Motorhome Paint Jobs La Habra, CA
Rv Exterior Paint La Habra, CA
Paint Rv La Habra, CA
Rv Exterior Paint La Habra, CA
Custom Motorhome Paint Jobs La Habra, CA
Painting An Rv La Habra, CA
Rv Paint Repair La Habra, CA
Painting Fiberglass Motorhome La Habra, CA
Custom Rv Paint Jobs La Habra, CA
Painting Rv Walls La Habra, CA
Painting Rv La Habra, CA
Custom Motorhome Paint Jobs La Habra, CA
Motorhome Paint Repair La Habra, CA
Motorhome Paint Repair La Habra, CA
Painting Fiberglass Motorhome La Habra, CA
Class A Rv Custom Paint And Repair La Habra, CA
Motorhome Custom Paint La Habra, CA
Rv Paint And Body Shops Near Me La Habra, CA
Motorhome Paint Repair La Habra, CA
Custom Painted Motorhomes La Habra, CA
Motorhome Custom Paint Jobs La Habra, CA
Paint Fiberglass Rv La Habra, CA
Custom Rv Paint Jobs La Habra, CA
Rv Exterior Paint La Habra, CA
Motorhome Paint Repair La Habra, CA
Rv Paint And Repair La Habra, CA
Painting Rv Exterior La Habra, CA
Motorhome Custom Paint La Habra, CA
Motorhome Painting Near Me La Habra, CA
Motorhome Custom Paint La Habra, CA
Painting An Rv La Habra, CA
Custom Motorhome Paint Jobs La Habra, CA
Rv Paint And Body Shops Near Me La Habra, CA
Custom Motorhome Paint Jobs La Habra, CA
Custom Painted Motorhomes La Habra, CA
Custom Rv Paint La Habra, CA
Rv Painting Near Me La Habra, CA
Paint Fiberglass Rv La Habra, CA
Rv Paint And Repair La Habra, CA
Motorhome Paint Shops La Habra, CA
Motorhome Paint Shops La Habra, CA
Painting Rv Walls La Habra, CA
Painting Rv Exterior La Habra, CA
Motorhome Paint Repair La Habra, CA
Rv Painting La Habra, CA
Rv Paint Shop Near Me La Habra, CA
Motorhome Painting La Habra, CA
Rv Paint Job La Habra, CA
Rv Exterior Paint La Habra, CA
Motorhome Paint Shops La Habra, CA
Paint Fiberglass Rv La Habra, CA
Rv Paint Repair La Habra, CA
Rv Paint And Body Shops Near Me La Habra, CA
Rv Paint Shop Near Me La Habra, CA
Painting Rv Exterior La Habra, CA
Finding A Local Seo Management La Habra, CA
Local Seo Company Near Me La Habra, CA
OCRV Center
Rv Exterior Paint La Habra, CA
Paint Motorhome Exterior La Habra, CA
Table of Contents
- – OCRV Center
- – What Makes Custom RV Paint Jobs Near Me the To...
- – Understanding Full Body Repaint RV vs Partial...
- – Benefits of Comprehensive Exterior Work
- – When Partial Repairs Make Sense
- – How Much Does a Full Body RV Paint Job Cost in...
- – Cost Breakdown by Motorhome Class and Size
- – Class A Motorhomes ($10,000–$20,000+)
- – Class C and Smaller Units ($5,000–$12,000)
- – Factors Influencing Pricing
- – Prep Work and Fiberglass Repairs
- – Custom Designs and Graphics Add-Ons
- – Insurance Claim Handling for Paint Repairs
- – What Is the Step-by-Step Process for Professio...
- – Initial Assessment and Color Matching
- – Advanced Systems for Factory Accuracy
- – Surface Preparation and Priming
- – Addressing Common Damage Types
- – Application and Curing in Controlled Environm...
- – Heated Booth Advantages
- – Final Inspection and Protection Layers
- – Why Choose Experts for Custom RV Paint Jobs Ne...
- – Key Differentiators in Quality and Service
- – Certifications and Affiliations
- – Satisfaction Guarantee Details
- – Real Results from Motorhome Owners
- – Common Concerns About Custom RV Paint Jobs Nea...
- – Concern: Will the Finish Last in Harsh Condit...
- – Solutions with UV Protection and Quality Mat...
- – Concern: How Disruptive Is the Timeline?
- – Efficient Scheduling and Turnaround Expectat...
- – Concern: Matching Original or Custom Colors A...
- – We Can Help! Contact Us Today
- – Frequently Asked Questions About Custom RV Pai...
- – OCRV Center
Latest Posts
Restaurant Hood Cleaning Service West Hollywood
Van Nuys Home Hvac Maintenance
Heating And Air Conditioning Repair Montrose
More
Latest Posts
Restaurant Hood Cleaning Service West Hollywood
Van Nuys Home Hvac Maintenance
Heating And Air Conditioning Repair Montrose