All Categories
Featured
Table of Contents
- – Rv Roof Replacement Placentia, CA
- – OCRV Center
- – Rv Roof Repair Fiberglass Placentia, CA
- – Rv Trailer Rubber Roof Repair Placentia, CA
- – Rv Rubber Roof Repair Placentia, CA
- – Repair Rv Roof Leak Placentia, CA
- – Class C Rv Roof Repair Placentia, CA
- – Rubber Roof For Camper Placentia, CA
- – Resealing Rv Roof Placentia, CA
- – Rv Roof Repair Fiberglass Placentia, CA
- – Rv Roof Leak Repair Near Me Placentia, CA
- – Rv Roof Repair Fiberglass Placentia, CA
- – Class C Rv Roof Repair Placentia, CA
- – Rv Rubber Roof Maintenance Placentia, CA
- – Resealing Rv Roof Placentia, CA
- – Rv Roof Repair Near Me Placentia, CA
- – Replace Rv Roof Placentia, CA
- – OCRV Center
Rv Roof Replacement Placentia, CA
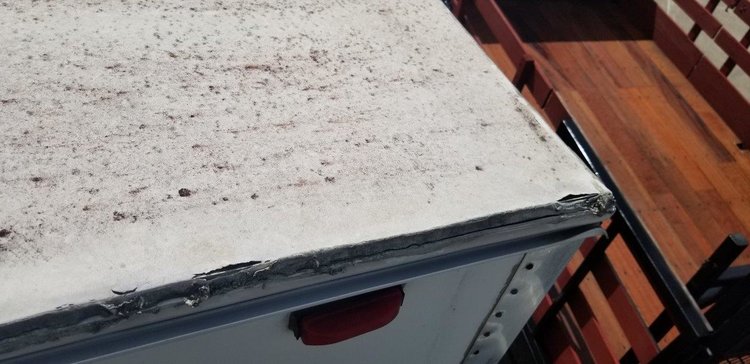
While you're cleansing, scuff off any type of particles or old roofing product, yet be careful while you do this as you could conveniently elongate a tear, or perhaps punch a hole through the roofing. You ought to then dry the roof as best as you can. Keep In Mind: Rubber RV roof coverings can be very unsafe when damp.
After the roof is clean, you are going to intend to check the seams for holes, fractures or peeling off, so you can reseal any place necessary. On top of that, you'll intend to challenge resealing all joints once a year whether they reveal indications of wear.
Rv Roof Repair Fiberglass Placentia, CA
When it involves picking the most effective recreational vehicle roofing sealant, you'll want to think about whether you are repairing a tear, resealing a joint, or securing the entire roofing system. The sort of roofing system is additionally essential to bear in mind, as recreational vehicle roofings can be made from either EPDM (Ethylene Propylene Diene Monomer) and TPO (Thermal Polyolefin) and you need the product you make use of to be compatible with your roofing system type.
Dicor Self-Leveling Lap Sealer is a good choice for reviewing old roof seals. It can be utilized for area securing or to reseal every joint on the motor home roof covering. Simply clean the area well and use with a caulk gun. The things will certainly level itself out, so don't stress regarding that part.
Rv Trailer Rubber Roof Repair Placentia, CA
Similar to the EPDM system noted above, this finish product will cover your TPO roofing and assist it last an additional 10 years. Before EPDM and TPO, steel was the product of option for RV roof coverings.
The abovementioned EternaBond is still king when it comes to fixing small problems on a steel roof. It additionally functions well for sealing seams. Motor home metal roof coverings do require to be totally resealed every now and then. Family roofing system finishings will certainly seal a steel roofing just fine, yet the best item by far, for metal roofings, is Dicor Steel RV Roof Finish.
Rv Rubber Roof Repair Placentia, CA
See to it to reseal whenever required and resolve resealing all of the seams when every twelve month or two. Dicor Self-Leveling Lap Sealant functions well for this task. If your fiberglass roofing requires to be coated, Dicor Fiberglass Roofing System Covering is a great pick. You'll require to eliminate the current roof covering.
Do this in tiny chunks all along the roofing system, reducing openings in the rubber roofing for any attribute that will certainly go back into the roof. Change your roofing's fans, skylights, and Air conditioner system.
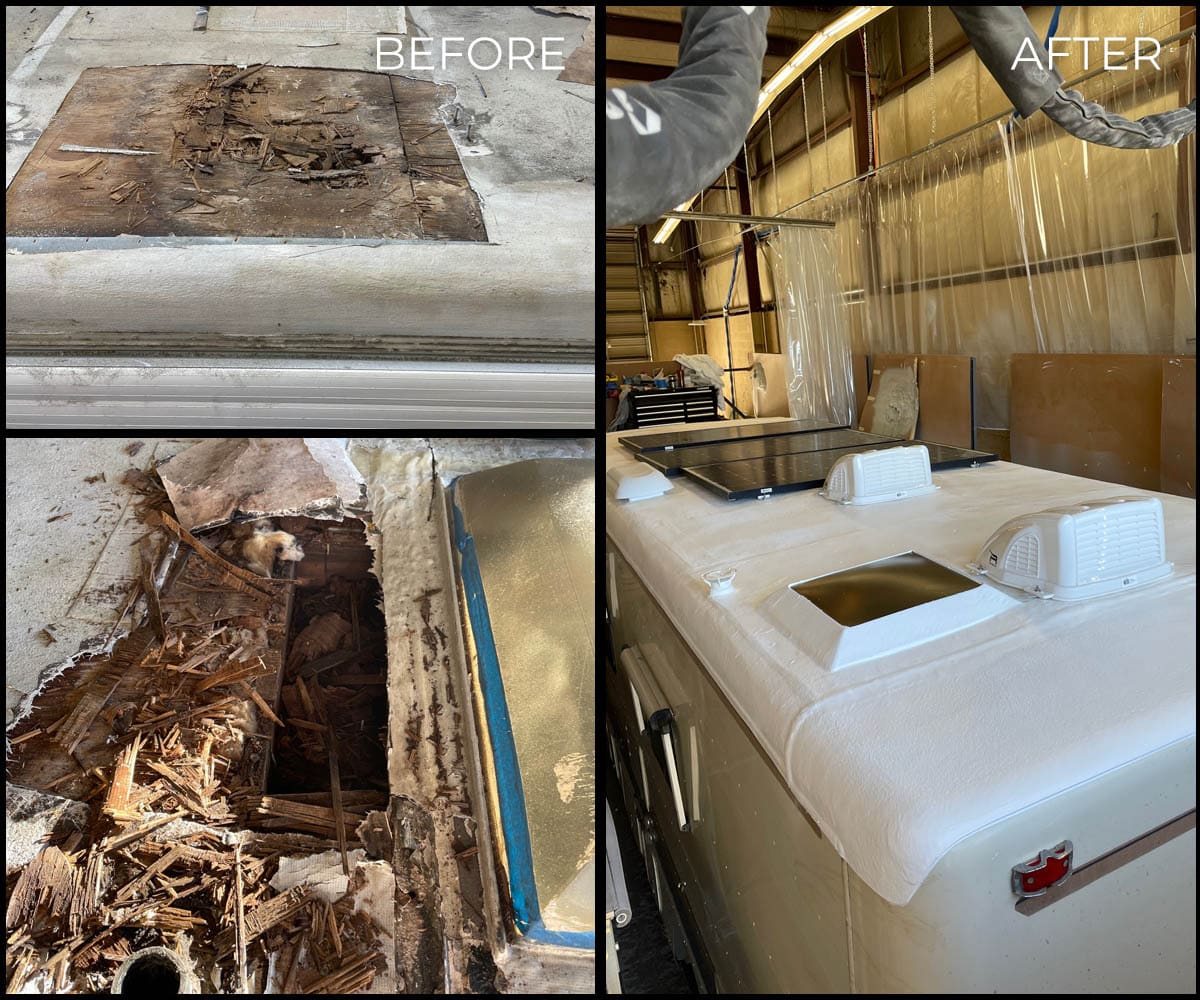
My RV roof covering that needs to be changed! Welcome to my Recreational Vehicle Restoration Series!.?.!! So you desire a motor home yet can't manage one. If you resemble me and have more time than cash, then possibly your best choice is to acquire an old motor home and fix it up. If you happen to locate a really good offer, then opportunities are it has water damage.
Repair Rv Roof Leak Placentia, CA
I get it. I purchased my recreational vehicle over a year ago and didn't have the digestive tracts to start tackling this job until today. I'm here to inform you, if I can do it, you can do it. Can I actually do it? Remain tuned and learn! I bought this 1993 Jamboree for $5000.
The catch? Water damages! I've never worked with a recreational vehicle prior to and I need to admit, I'm afraid. I've done a great deal of residence remodeling and I'm still scared. That's due to the fact that this is all new to me and I have no concept what to expect. With any luck if you're thinking about doing this on your own, complying with along on my RV roofing system substitute task will certainly offer you the nerve to dive in! The tools I used today.
Class C Rv Roof Repair Placentia, CA
I purchased a 12 x 26 SuperMax Canopy by ShelterLogic (over $450 on Amazon yet I purchased mine from North Device for around $340!) and jacked up the legs with timber expansions to make the cover high enough that I can depend on the roof covering and walk below it. That appeared to be my cheapest alternative.
I figured I prefer to have it semi-portable so I went with the cover, plus this enables me to change the elevation backwards and forwards when I need to. Certainly the most inexpensive choice of all would be to simply throw a good tarpaulin over the top of your motor home for rainy days and just service warm days! Originally I elevated the legs with 1 1/2 PVC pipeline that fit inside the legs and after that I affixed a tube clamp around the PVC pipe to hold up the cover legs.
This is still a little drooping. I probably should have forked out for some inflexible steel pipeline from the begin.
An old patch work on the Motor home rubber roofing. As you can see, this roof covering has had a great deal of concerns over the years.
Rubber Roof For Camper Placentia, CA
On the base is the original EPDM rubber roofing layer - Rv Roof Repair Fiberglass Placentia. I understand it's EPDM rubber and not TPO rubber since of the black backing. On top of my EPDM roof covering is a thin Recreational vehicle roof layer that was used later on.
I simply left the roofing system coating stuck to the EPDM roofing and pulled them up with each other. Starting to peel off roofing coating.
Resealing Rv Roof Placentia, CA
All rubber roof covering eliminated from camper. There was an adhesive under the bottom layer of rubber that was still pretty well stuck in lots of locations, yet with an excellent bit of force it peeled up easily.
Now I could see all the damaged plywood roof covering outdoor decking beneath. I have to caution you, the old adhesive was still sticky, and a discomfort to walk on.
If you assume you'll be conserving the roofing system outdoor decking plywood (not changing it), after that you may save on your own some cleanup difficulty by eliminating the fixtures initially and then peeling off up the rubber! Detail of water damage on camper roof. Extra water damaged areas on motor home roofing outdoor decking. There was absolutely nothing actually horrible that made me really feel like I was going to fail, but absolutely a whole lot of damage and I was getting the sensation I would be replacing a great deal of the roofing outdoor decking plywood.
Rv Roof Repair Fiberglass Placentia, CA
I went for the most basic one first, an air vent cap from a kitchen sink pipes vent pipe. There is no other method around this, you just have to start digging till you reveal the screw heads.
Unscrewing the screws in vent cap. The screws on this air vent cap were hex-head metal screws so I used a little outlet chauffeur to remove them. Some came out clean. Others were rusted and I had to use a vice-grip pliers to get the heads and transform them little by little.
I found an old wasp nest inside the air vent cover. This is a sight I'll probably need to get used to, locating the remains of animal habitation high and low. I spend a terrible great deal of my time developing good wild animals habitat in my backyard so I do not get angered when an animal selects to set up home in my motor home.
Rv Roof Leak Repair Near Me Placentia, CA
Luckily no one was home in this old nest so I simply threw it. You must try not to damage these items (like air vent covers and caps) as you're scuffing off the old caulk and sealant simply in case you require to utilize them once more.
One down, 7 even more components to go. Next I decided to deal with the only roofing ventilation follower that my camper has - Rv Roof Repair Fiberglass Placentia. My roofing system air vent likewise had an air vent cover over it. I began scratching the crud from those screws. Beginning on the roofing system vent. Equipment subjected on roof vent cap, the very first nut came off tidy.
Rv Roof Repair Fiberglass Placentia, CA
The bolts on this RV roofing air vent cover were nuts on little bolts. The second one simply began spinning, indicating the screw was not fixed in place but transforming along with the nut. A peek at the hardware holding down the roofing air vent cover.
I didn't have any type of excellent way to hold the bolt in position so instead I chose to saw with the screws with a reciprocating saw. Sawing through bolts on roof covering air vent cover. I used a cordless reciprocating saw with a metal-cutting blade however it was challenging to obtain the blade level enough to reach the screws so near the roofing system deck.
Class C Rv Roof Repair Placentia, CA
Flexing the blade a little bit to reach close to the roof deck. Cover removed from roofing air vent.
A lot of were so old and rusted that they sheared off when I unscrewed then with a great deal of force. Unscrewing the braces that held the vent cover in location. I scratched much more caulk and roofing system sealer off the flange of the roof vent itself. I quickly uncovered there were no much more screws or hardware stifling so I surrendered on the scraping and went inside the recreational vehicle After scraping the caulk and sealer from flange of roof covering air vent, say goodbye to screws! Unscrewing the within cover plate of roof air vent follower in recreational vehicle shower room.
Rv Rubber Roof Maintenance Placentia, CA
I picked a drill little bit close to the size of the shaft of the screws that I had actually currently pulled out and began boring. Choosing a drill bit for drilling out a screw head.
Instead of standing out off the screw head, the plastic simply melted away around the hot screw head. Hope I do not have to reuse this cover.
Resealing Rv Roof Placentia, CA
Once the brackets were out I went back up top to tear out the the roof vent. There are two cables running to the roofing system vent (a black hot wire and a white neutral wire) that you'll require to clip to eliminate the old air vent.
These are the cords connecting the roofing airing vent fan. I clipped them simply over the blue splice joints. Roofing vent removed and tidied up. After clipping the cable and getting rid of the air vent, I tidied up any type of staying goop and obtained my very first good take a look at the roof frame. It's metal! 1 1/2 inches thick.
Some recreational vehicle roofings are mounted with wood, others have metal framing. I had no concept what remained in my camper up until this point. Not too happy regarding the quantity of corrosion on it, but hopefully it is still structurally sound! I removed some corrosion and made a huge mess inside the washroom.
Oops. Perhaps I ought to have put a tarpaulin down first. My final goal of the day was to get the fridge air vent cover off. I saw motor home sealant blobs at four factors on the cover so presumed there have to be screws under them. I tore them up and discovered Phillips screw heads.
Rv Roof Repair Near Me Placentia, CA
Subjecting the screws in the refrigerator air vent cap. Peeling old motor home roofing system coating on top of fridge air vent cap I likewise noticed that there was a coat of RV roofing covering over the vent cap. These finishings are painted on with a brush so plainly whoever did this finish just blobbed know top of every little thing.
Taking off the cover of the fridge roofing vent. As soon as the cap is off it's more of the exact same. Reducing away more rubber and removing motor home roof covering sealer and old caulk. Obtain comfortable because this sucker has 32 screws in it! Ugh. Scuffing lap sealer and caulk from screw heads.
Tearing off the refrigerator roof vent after all screws are removed. Virtually every screw was in excellent sufficient problem to eliminate with a socket vehicle driver, however a pair were as well rusty and required to be turned out with vice grip pliers.
Replace Rv Roof Placentia, CA
I removed the remaining rubber roofing system from under the flange and afterwards scratched off the old putty underneath. I'll clean it much better if and when I make a decision to recycle it. Appears like it's in suitable form so I possibly will. Removing the old putty from the flange of the refrigerator roofing system vent.
Rv Slide Out Roof Repair Placentia, CABest Rv Roof Repair Placentia, CA
Rv Rubber Roof Maintenance Placentia, CA
Epdm Rv Roof Repair Placentia, CA
Rv Roof Repair Placentia, CA
Rv Roof Leak Repair Placentia, CA
Rv Roof Leak Repair Near Me Placentia, CA
Motorhome Roof Replacement Placentia, CA
Rubber Roofing For Campers Placentia, CA
Rv Roof Repair Placentia, CA
Rv Roof Repair Fiberglass Placentia, CA
Replace Rv Roof Placentia, CA
Roof Repair For Rv Placentia, CA
Repair Rv Roof Leak Placentia, CA
Rv Roof Repair Near Me Placentia, CA
Rv Roof Repair Near Me Placentia, CA
Rv Roof Replacement Placentia, CA
Rv Roof Repair Fiberglass Placentia, CA
Rv Roof Repair Service Near Me Placentia, CA
Rv Roof Repair Fiberglass Placentia, CA
Rv Roof Repair Placentia, CA
Rv Trailer Rubber Roof Repair Placentia, CA
Rv Slide Out Roof Repair Placentia, CA
Rv Rubber Roof Repair Placentia, CA
Rubber Roof For Camper Placentia, CA
Rv Roof Leak Repair Near Me Placentia, CA
Rubber Roof For Camper Placentia, CA
Best Rv Roof Repair Placentia, CA
Rubber Roof For Camper Placentia, CA
Rv Rubber Roof Replacement Cost Placentia, CA
Rubber Roof For Camper Placentia, CA
Rv Roof Leak Repair Placentia, CA
Rubber Roofing For Campers Placentia, CA
Rv Roof Repair Placentia, CA
Rv Roof Leak Repair Near Me Placentia, CA
Rv Fiberglass Roof Repair Placentia, CA
Rubber Roofing For Rv Placentia, CA
Rubber Roofing For Rv Placentia, CA
Rv Roof Repair Fiberglass Placentia, CA
Best Rv Roof Repair Placentia, CA
Rv Roof Repair Placentia, CA
Replace Rv Roof Placentia, CA
Rv Trailer Roof Repair Placentia, CA
Rv Roof Repair Fiberglass Placentia, CA
Rv Roof Leak Repair Near Me Placentia, CA
Rv Rubber Roof Replacement Cost Placentia, CA
Rv Roof Replacement Placentia, CA
Rubber Roofing For Campers Placentia, CA
Rubber Roof For Rv Placentia, CA
Rv Roof Maintenance Placentia, CA
Motorhome Roof Replacement Placentia, CA
Rubber Roofing For Rv Placentia, CA
Epdm Rv Roof Repair Placentia, CA
Epdm Rv Roof Repair Placentia, CA
Repair Rv Roof Leak Placentia, CA
Rv Roof Repair Service Near Me Placentia, CA
Rubber Roof For Rv Placentia, CA
Rv Roof Repair Service Near Me Placentia, CA
Rv Fiberglass Roof Repair Placentia, CA
Rv Roof Repair Near Me Placentia, CA
Rv Rubber Roof Replacement Cost Placentia, CA
Rv Rubber Roof Replacement Placentia, CA
Rv Roof Replacement Placentia, CA
Rv Rubber Roof Maintenance Placentia, CA
Rv Roof Repair Near Me Placentia, CA
Rubber Roof For Camper Placentia, CA
Rv Roof Repair Near Me Placentia, CA
Rubber Roofing For Rv Placentia, CA
Epdm Rv Roof Repair Placentia, CA
Rv Slide Out Roof Repair Placentia, CA
Rv Fiberglass Roof Repair Placentia, CA
Rv Roof Maintenance Placentia, CA
Class C Rv Roof Repair Placentia, CA
Rubber Roof For Camper Placentia, CA
Rv Roof Leak Repair Placentia, CA
Rv Rubber Roof Replacement Placentia, CA
Rv Roof Replacement Placentia, CA
Rv Trailer Rubber Roof Repair Placentia, CA
Around Here Seo Packages Placentia, CA
Close To Seo Company Placentia, CA
OCRV Center
Table of Contents
- – Rv Roof Replacement Placentia, CA
- – OCRV Center
- – Rv Roof Repair Fiberglass Placentia, CA
- – Rv Trailer Rubber Roof Repair Placentia, CA
- – Rv Rubber Roof Repair Placentia, CA
- – Repair Rv Roof Leak Placentia, CA
- – Class C Rv Roof Repair Placentia, CA
- – Rubber Roof For Camper Placentia, CA
- – Resealing Rv Roof Placentia, CA
- – Rv Roof Repair Fiberglass Placentia, CA
- – Rv Roof Leak Repair Near Me Placentia, CA
- – Rv Roof Repair Fiberglass Placentia, CA
- – Class C Rv Roof Repair Placentia, CA
- – Rv Rubber Roof Maintenance Placentia, CA
- – Resealing Rv Roof Placentia, CA
- – Rv Roof Repair Near Me Placentia, CA
- – Replace Rv Roof Placentia, CA
- – OCRV Center
Latest Posts
Best Wedding Photographers In Mission Viejo
Brea Medicare Providers Near Me
Senior Health Insurance Aliso Viejo
More
Latest Posts
Best Wedding Photographers In Mission Viejo
Brea Medicare Providers Near Me
Senior Health Insurance Aliso Viejo