All Categories
Featured
Table of Contents
- – Best Rv Roof Repair Rowland Heights, CA
- – OCRV Center
- – Rv Roof Leak Repair Rowland Heights, CA
- – Repair Rv Roof Leak Rowland Heights, CA
- – Rubber Roofing For Rv Rowland Heights, CA
- – Rv Roof Repair Near Me Rowland Heights, CA
- – Rv Rubber Roof Replacement Rowland Heights, CA
- – Rv Roof Maintenance Rowland Heights, CA
- – Rv Trailer Roof Repair Rowland Heights, CA
- – Epdm Rv Roof Repair Rowland Heights, CA
- – Class C Rv Roof Repair Rowland Heights, CA
- – Rv Roof Leak Repair Near Me Rowland Heights, CA
- – Resealing Rv Roof Rowland Heights, CA
- – Rv Rubber Roof Maintenance Rowland Heights, CA
- – Motorhome Roof Replacement Rowland Heights, CA
- – OCRV Center
Best Rv Roof Repair Rowland Heights, CA
As you can see from the significant result of an improperly kept joint in the video ingrained above, any seams on Recreational vehicles must be frequently examined for the honesty of the sealer. All you require apart from a putty blade to aid with the elimination of the old Dicor is a tube of Dicor and a caulk gun.
Know plainly what is and is not covered by your recreational vehicle insurance policy, and ask how to get the insurance coverage you want, depending upon its cost. Where recreational vehicle roofing system leakages are concerned, it might depend on the way the damage happened. Insurance policy companies DENY insurance claims on the damage that occurs from leakages that are considered to be maintenance-related.
Dicor sealer that is split such as this from direct exposure to the sun and various other climate requires to be changed. It's a very easy and beneficial work. A quick check of the sealer around vents, followers, solar panels, a/c unit, and antennas every 1 month or two maintains our RV roofing in great condition, avoiding potentially costly leakages.
Rv Roof Leak Repair Rowland Heights, CA
Once again we motivate you to talk with your insurance policy representative about your coverage. RV roof covering leakages can be genuine mischief-makers. Knowing how to avoid them to begin with is your extremely best defense against possibly significant damage to your recreational vehicle, and even to your health and wellness. Join our e-newsletter to learn more about all points RV-related.
Whether this is your very first time when traveling or you're an experienced specialist, we 'd love for you to geek out with us!.
Repair Rv Roof Leak Rowland Heights, CA
Possessing a motor home offers flexibility and journey, but it also features a reasonable share of upkeep obligations. Among one of the most vital jobs for RV owners is keeping the integrity of the roofing. A leaking motor home roofing system can bring about comprehensive indoor damages, mold and mildew development, and even architectural problems if left without treatment.
If not dealt with, water invasion can bring about: Delamination of walls and ceiling By doing normal assessments and recognizing just how to take care of motor home roof covering repair, you can expand the life of your automobile and stay clear of costly damages. Before you can deal with a leak, you need to locate it. This can be more difficult than it appears, as water typically travels much from the entry point before showing noticeable indicators.
Check out the sides of the roofing system where it satisfies the walls. Inside the Recreational vehicle, look for staining or drooping in the ceiling.
Think about making use of a fluid roof layer: Conceal off locations not to be coated. Mix and put the layer equally throughout the roofing.
Rubber Roofing For Rv Rowland Heights, CA
Clean every 3-6 months, depending on usage and storage space. Stay clear of car park under trees where limbs and sap can damage the roof covering. While numerous Motor home roof covering repair services can be Do it yourself tasks, some situations require specialist aid: Structural damage or significant roof drooping Big, hidden leaks that are difficult to trace Complete membrane layer replacement Insurance-related repairs Finding out exactly how to perform a Motor home roof covering repair service empowers you to safeguard your investment, save money, and avoid mid-trip catastrophes.
If you don't evaluate, reseal, and repair your motor home roof frequently, you will end up with some attractive horrible water damage. This is something that will rapidly reduce the value of your RV and could also provide it pointless. Thankfully, dealing with your recreational vehicle roofing is something you can probably do all on your own.
After about 10 years, it will certainly additionally be needed to reseal the entire roof. To do this, you'll require to climb up onto the roofing system, yet be really cautious when you do.
Rv Roof Repair Near Me Rowland Heights, CA
Next, you'll wish to cleanse your roofing extensively, so regarding get rid of any kind of dust bits. You can utilize a long handled brush for this, however never utilize a cleaner which contains oil solvents or citrus ingredients on your rubber or vinyl roofing. These types of cleansers will cause long-term damages to the surface.
While you're cleaning, scuff off any particles or old roofing material, however beware while you do this as you can conveniently elongate a tear, and even punch a hole via the roofing. You need to after that dry the roof as best as you can. Note: Rubber motor home roofs can be extremely unsafe when damp.
After the roof is tidy, you are going to intend to check the joints for openings, splits or peeling off, so you can reseal wherever required. You'll want to make a factor of resealing all seams once a year whether or not they reveal signs of wear.
Rv Rubber Roof Replacement Rowland Heights, CA
When it comes to picking the best Recreational vehicle roof covering sealer, you'll want to consider whether you are repairing a tear, resealing a seam, or sealing the whole roof covering. It can be made use of for area securing or to reseal every joint on the Recreational vehicle roof covering. Simply clean the area well and use with a caulk gun.
Rv Roof Maintenance Rowland Heights, CA
This tops and layers the roofing to produce a wonderful, protective finishing that'll last for several years. Finally, there is the Dicor TPO Roofing Finishing System. Similar to the EPDM system detailed above, this coating item will certainly cover your TPO roofing and help it last another ten years. Before EPDM and TPO, steel was the product of option for motor home roofing systems.
The previously mentioned EternaBond is still king when it comes to fixing tiny damages on a metal roof covering. RV steel roofings do require to be absolutely resealed from time to time.
Dicor Self-Leveling Lap Sealant works well for this job. You'll need to get rid of the existing roof covering.
Inspect plywood for rot, bowing, mold, or splintering. Replace damaged items.
Rv Trailer Roof Repair Rowland Heights, CA
Do this in tiny pieces all along the roof, reducing holes in the rubber roof for any kind of attribute that will certainly return right into the roof covering. Ultimately, replace your roofing's followers, skylights, and AC system. Seal each joint with the lap sealant we discussed previously. You'll additionally wish to apply lap sealer to the edges of the roofing system.
In this post, we want to share with you exactly how to DIY Motor home roofing system repair. Recognizing how to DIY a whole lot of the things that can damage or mess up will conserve you not just a great deal of cash on Recreational vehicle repairs however might additionally save you a great deal of possible time in the shop!
Epdm Rv Roof Repair Rowland Heights, CA
I might obtain a little commission when you make a purchase using my web link. Sometimes, though, we discover ourselves in unplanned situations. This is just how we ended up with a few tiny splits on the roof of our Recreational vehicle.
We thought we were free from the branches, yet we wound up catching a few of them on the far left side of the roof covering. There were an overall of 4-5 small openings in the side of the roof. We didn't examine the roofing due to the fact that we didn't believe we hit anything.
Among the rips in our motor home roofing A couple of weeks later on, we endured a serious thunderstorm and a LOT of rainfall. Throughout the storm, we discovered that we had a little amount of water dripping with one of the light fixtures in the shower room. Fortunately, we did not end up with any type of permanent water damages.
Class C Rv Roof Repair Rowland Heights, CA
He patched it as ideal he can with durable gorilla tape and after that purchased the products required to do a motor home roofing system repair. The EPDM rubber roofing material that most Motor homes come with is usually quite difficult as for roofing products go. Rubber roofing systems last for years, but they do tear if caught hard enough.
In our instance, this implied getting rid of the gorilla tape that we had made use of as a short-lived repair while we waited for the materials we purchased to arrive. You'll intend to cleanse the location around the tear that you will be covering well. This allows the patch to appropriately adhere and will certainly protect against future leakages.
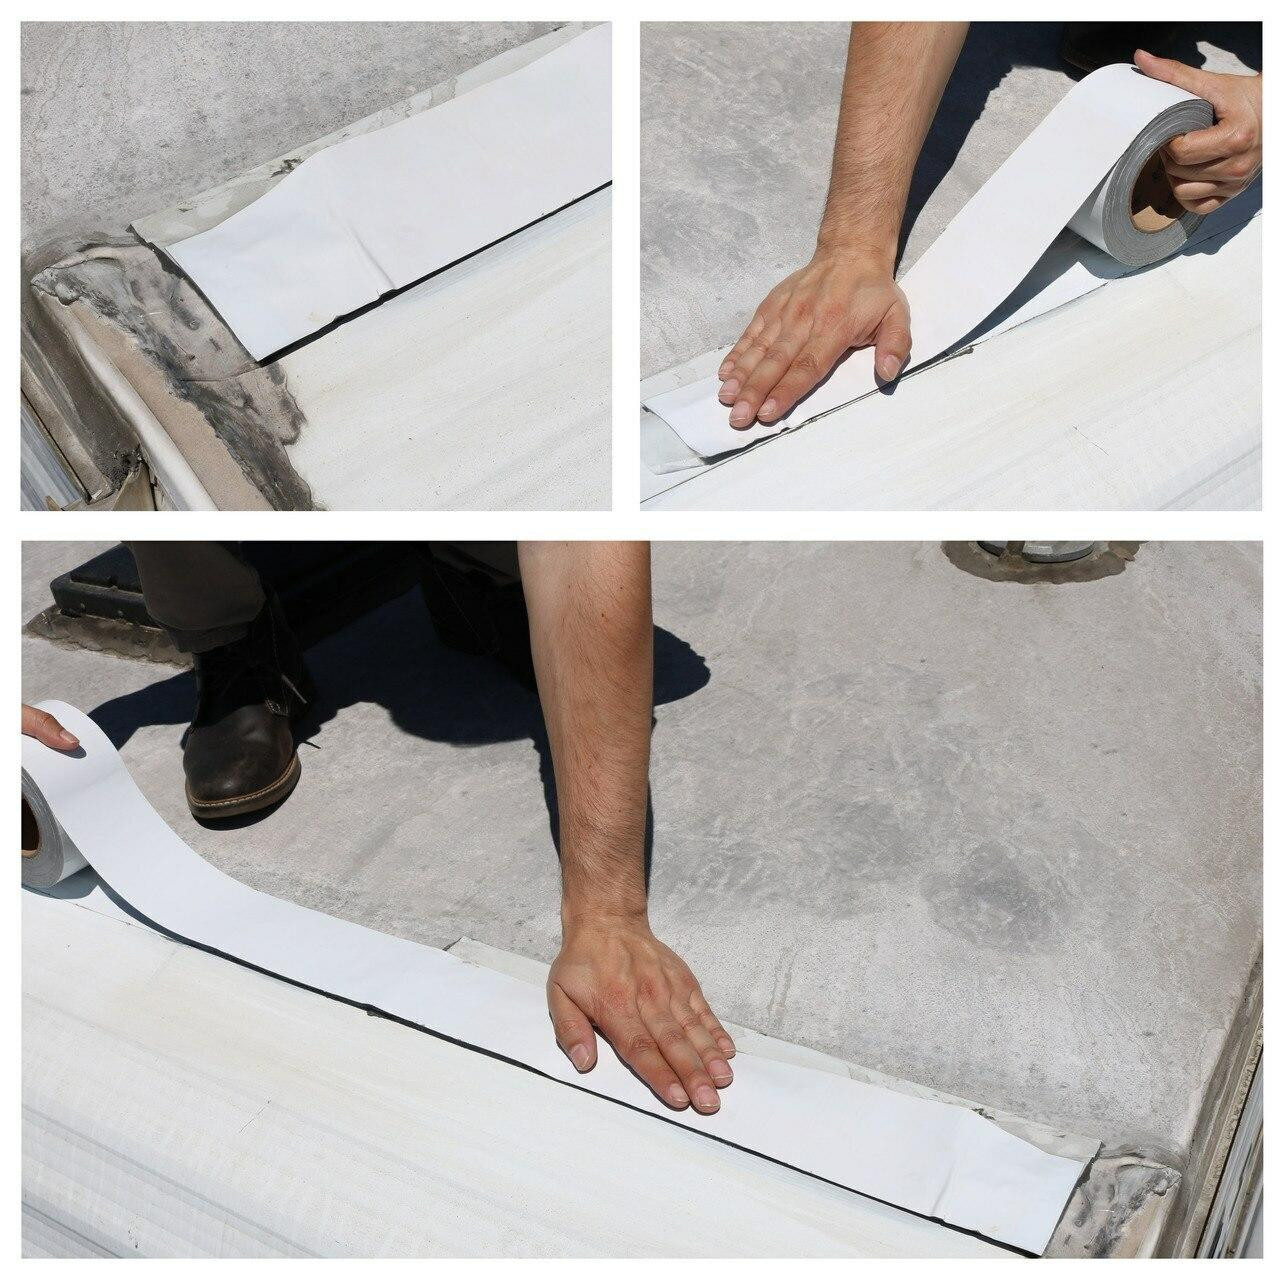
To cleanse the roof covering, use rubbing alcohol and either a rag or paper towels., which is a Motor home roofing system repair tape.
You will desire to measure out just how much you require and cut an item as necessary. Eliminate the backing and apply thoroughly over the tear in the roof. Once it has touched the roof covering, it adheres rather rapidly, so you'll intend to ensure and placement it right the very first time.
Rv Roof Leak Repair Near Me Rowland Heights, CA
Press securely and remain to scrub it and ravel the spot for numerous mins. Using a caulk weapon, coat the whole patch with Dicor 501LSW-1 Epdm Self-Leveling Lap Sealer. This rubber sealer creates a secure secondary seal on your rubber roof covering and ensures that the leak is correctly secured.
There are a great deal of Dicor recreational vehicle roofing system repair work items that you can get consisting of roofing coatings, roofing system sealant, and a lot more for the surface of your roofing. Applying the Dicor lap sealer Beginning on the brink and work your way around the entire patch, loading in the middle as you go.
Clean any kind of excess off and don't allow it to diminish too much. This is a self-leveling sealant so you should finish up with a rather level spot (Rowland Heights Rv Fiberglass Roof Repair). According to the maker, it will certainly be waterproof in 4 hours, 80% healed in two days, and 100% healed in one month
Resealing Rv Roof Rowland Heights, CA
To replace an entire RV roof covering with significant damages would certainly lead to far more expensive repairs. I really hope that you have actually discovered the information in this post useful. Make sure and pin this blog post for future referral in case you could need it in the future! To stop RV roof covering problems, checking your roofing frequently during motor home maintenance is a great idea.
Your recreational vehicle is a home on wheels, whether for a number of days at a time or throughout the year. Like a home, the water systems can leak, such as the fresh water container or the water heating system. A recreational vehicle is also much more prone to particular leaks, such as in the roof, because it is mobile and has a more lightweight style than your home.
The ideal technique for minimizing prices is determining usual leakages early and giving an effective fix. Your motor home is a considerable financial investment. Assessments and repairs keep it in excellent condition so you can enjoy extra adventures when traveling. Here are a couple of reasons maintenances matter: When you examine your motor home on a regular basis, you can capture issues like leakages prior to they create substantial damages to your interior.
Rv Rubber Roof Maintenance Rowland Heights, CA
Water dripping from the air conditioning device outside the recreational vehicle is regular throughout operation. The water ought to comply with a certain course down the networks on the roof covering that lead it to either the forward or aft edge of the rig. Nonetheless, if you see water leaking inside or dripping in an additional area outside, that might signify an issue with the system.
Plumbing leaks can show up in the storage compartment. Occasionally, water damages presents noticeable indicators, but you might not observe it immediately in various other cases. Right here are a few things to keep an eye out for: Mold and mildew and mildew growth Visible water discolorations or corrosion Puddles or wet spots Undesirable smells Flaking paint or aluminum Squeaky, soft or misshapen walls or floors Warped or buckled wood closets or trim Condensation on home windows or inside closets Water damages or condensation in your motor home can cause different hazardous effects.
They might additionally decrease resale worth. Prior to you begin the process of camper leak repair, you need to locate the resource. Comply with these actions to recognize the leakage's beginning point: Examine the roof, walls, ceilings and doors to discover any areas with worn or fractured seals and caulking. Check the wall surfaces and floorings for any kind of soft spots.
Take a look at any noticeable plumbing pipes and fittings for rust, dripping or damp places. Run water with the taps and check for trickling water at the connections. Check out wastewater and freshwater systems for cracks or leakages in the storage tanks, links and hose pipes. Odor for mildewy smells to discover where they stem.
Motorhome Roof Replacement Rowland Heights, CA
OCRV Center
Address: 23281 La Palma Ave Yorba Linda, CA 92887Phone: (714) 909-1444
Email: art@ocrvcenter.com
OCRV Center
Spray specific locations while somebody else stands inside the camper to see where water gets in. A flashlight illuminates the area for much more effective assessment in confined, dark locations like cupboards and plumbing fixtures. This gadget attaches to hoses to look for uncommon pressure drops that may show a leak.
Rv Mechanics Near Me Rowland Heights, CARv Repairs Near Me Rowland Heights, CA
Motorhome Refrigerator Repair Rowland Heights, CA
Full Service Rv Repair Near Me Rowland Heights, CA
Motorhome Repair Shops Rowland Heights, CA
Rv Service And Repair Near Me Rowland Heights, CA
Rv Refrigerator Repair Near Me Rowland Heights, CA
Camper Ac Repair Near Me Rowland Heights, CA
Rv Repair Places Near Me Rowland Heights, CA
Motorhome Repair Near Me Rowland Heights, CA
Rv Solar Panel Installation Rowland Heights, CA
Rv Repair Centers Near Me Rowland Heights, CA
Rv Repair Service Near Me Rowland Heights, CA
Motorhome Repair Shop Rowland Heights, CA
Full Service Rv Repair Near Me Rowland Heights, CA
Rv Repair Services Near Me Rowland Heights, CA
Rv Solar Installation Rowland Heights, CA
Rv Service And Repair Near Me Rowland Heights, CA
Rv Repair Centers Near Me Rowland Heights, CA
Best Rv Repair Near Me Rowland Heights, CA
Rv Solar Panel Installation Rowland Heights, CA
Motorhome Awning Repair Rowland Heights, CA
Rv Repair Centers Near Me Rowland Heights, CA
Rv Ceiling Repair Rowland Heights, CA
Rv Ceiling Repair Rowland Heights, CA
Rv Service Repair Near Me Rowland Heights, CA
Rv Repair Shops Near My Location Rowland Heights, CA
Motorhome Repair Shop Rowland Heights, CA
Rv Repair Service Near Me Rowland Heights, CA
Rv Generator Repair Rowland Heights, CA
Rv Service Repair Near Me Rowland Heights, CA
Rv Repair And Service Near Me Rowland Heights, CA
Rv Repair Centers Near Me Rowland Heights, CA
Rv Repair In My Area Rowland Heights, CA
Best Rv Repair Near Me Rowland Heights, CA
Best Rv Repair Near Me Rowland Heights, CA
Motorhome Refrigerator Repair Rowland Heights, CA
Rv Repair Centers Near Me Rowland Heights, CA
Rv Repair Services Near Me Rowland Heights, CA
Rv Repair Centers Near Me Rowland Heights, CA
Motorhome Awning Repair Rowland Heights, CA
Motorhome Repair Service Rowland Heights, CA
Rv Repair Centers Near Me Rowland Heights, CA
Motorhome Service And Repair Near Me Rowland Heights, CA
Best Rv Repair Near Me Rowland Heights, CA
Motorhome Awning Repair Rowland Heights, CA
Rv Repair Services Near Me Rowland Heights, CA
Rv Repair And Service Near Me Rowland Heights, CA
Rv Repair Service Near Me Rowland Heights, CA
Rv Repair And Service Near Me Rowland Heights, CA
Motorhome Repair Near Me Rowland Heights, CA
Camper Ac Repair Near Me Rowland Heights, CA
Rv Service Repair Near Me Rowland Heights, CA
Rv Floor Repair Near Me Rowland Heights, CA
Rv Repair And Service Near Me Rowland Heights, CA
Rv Repairs Near Me Rowland Heights, CA
Rv Mechanics Near Me Rowland Heights, CA
Motorhome Awning Repair Rowland Heights, CA
Best Rv Repair Near Me Rowland Heights, CA
Motorhome Awning Repair Rowland Heights, CA
Motorhome Awning Repair Rowland Heights, CA
Rv Repair Centers Near Me Rowland Heights, CA
Rv Plumbing Repair Near Me Rowland Heights, CA
Rv Delamination Repair Near Me Rowland Heights, CA
Rv Repair In My Area Rowland Heights, CA
Best Rv Repair Near Me Rowland Heights, CA
Rv Repairs Near Me Rowland Heights, CA
Rv Repair In My Area Rowland Heights, CA
Rv Delamination Repair Near Me Rowland Heights, CA
Rv Mechanics Near Me Rowland Heights, CA
Rv Repair Shops Near My Location Rowland Heights, CA
Rv Repair Places Near Me Rowland Heights, CA
Motorhome Repair Near Me Rowland Heights, CA
Motorhome Awning Repair Rowland Heights, CA
Motorhome Generator Repair Near Me Rowland Heights, CA
Rv Mechanics Near Me Rowland Heights, CA
Rv Repair And Service Near Me Rowland Heights, CA
Rv Refrigerator Repair Near Me Rowland Heights, CA
Finding A Seo Companies Rowland Heights, CA
Best Seo Marketing Company Rowland Heights, CA
OCRV Center
Table of Contents
- – Best Rv Roof Repair Rowland Heights, CA
- – OCRV Center
- – Rv Roof Leak Repair Rowland Heights, CA
- – Repair Rv Roof Leak Rowland Heights, CA
- – Rubber Roofing For Rv Rowland Heights, CA
- – Rv Roof Repair Near Me Rowland Heights, CA
- – Rv Rubber Roof Replacement Rowland Heights, CA
- – Rv Roof Maintenance Rowland Heights, CA
- – Rv Trailer Roof Repair Rowland Heights, CA
- – Epdm Rv Roof Repair Rowland Heights, CA
- – Class C Rv Roof Repair Rowland Heights, CA
- – Rv Roof Leak Repair Near Me Rowland Heights, CA
- – Resealing Rv Roof Rowland Heights, CA
- – Rv Rubber Roof Maintenance Rowland Heights, CA
- – Motorhome Roof Replacement Rowland Heights, CA
- – OCRV Center
Latest Posts
Laguna Niguel Best Supplemental Insurance For Seniors
Lake Forest Vision Insurance For Seniors Over 65
Cheapest Insurance For Seniors Lake Forest
More
Latest Posts
Laguna Niguel Best Supplemental Insurance For Seniors
Lake Forest Vision Insurance For Seniors Over 65
Cheapest Insurance For Seniors Lake Forest