All Categories
Featured
Table of Contents
- – Rubber Roofing For Campers Walnut, CA
- – OCRV Center
- – Rubber Roofing For Rv Walnut, CA
- – Rv Roof Replacement Walnut, CA
- – Rv Roof Leak Repair Near Me Walnut, CA
- – Repair Rv Roof Walnut, CA
- – Class C Rv Roof Repair Walnut, CA
- – Epdm Rv Roof Repair Walnut, CA
- – Epdm Rv Roof Repair Walnut, CA
- – Rv Roof Leak Repair Walnut, CA
- – Rv Rubber Roof Replacement Cost Walnut, CA
- – Motorhome Roof Replacement Walnut, CA
- – Rv Trailer Roof Repair Walnut, CA
- – Rv Trailer Roof Repair Walnut, CA
- – OCRV Center
Rubber Roofing For Campers Walnut, CA
I figured I would certainly rather have it semi-portable so I chose the canopy, plus this permits me to change the height up and down when I require to. Obviously the most affordable alternative of all would be to just toss a good tarp over the top of your motor home for rainy days and only service bright days! Originally I elevated the legs with 1 1/2 PVC pipe that fit inside the legs and afterwards I connected a hose pipe clamp around the PVC pipe to stand up the cover legs.
Then I sawed 1 1/4 square legs from 24's to place inside the canopy legs (once again holding the canopy up with pipe clamps.) and strengthening the four edges with an added 24 screwed to it. This is still a little saggy. I most likely should have forked out for some rigid steel pipeline from the begin.
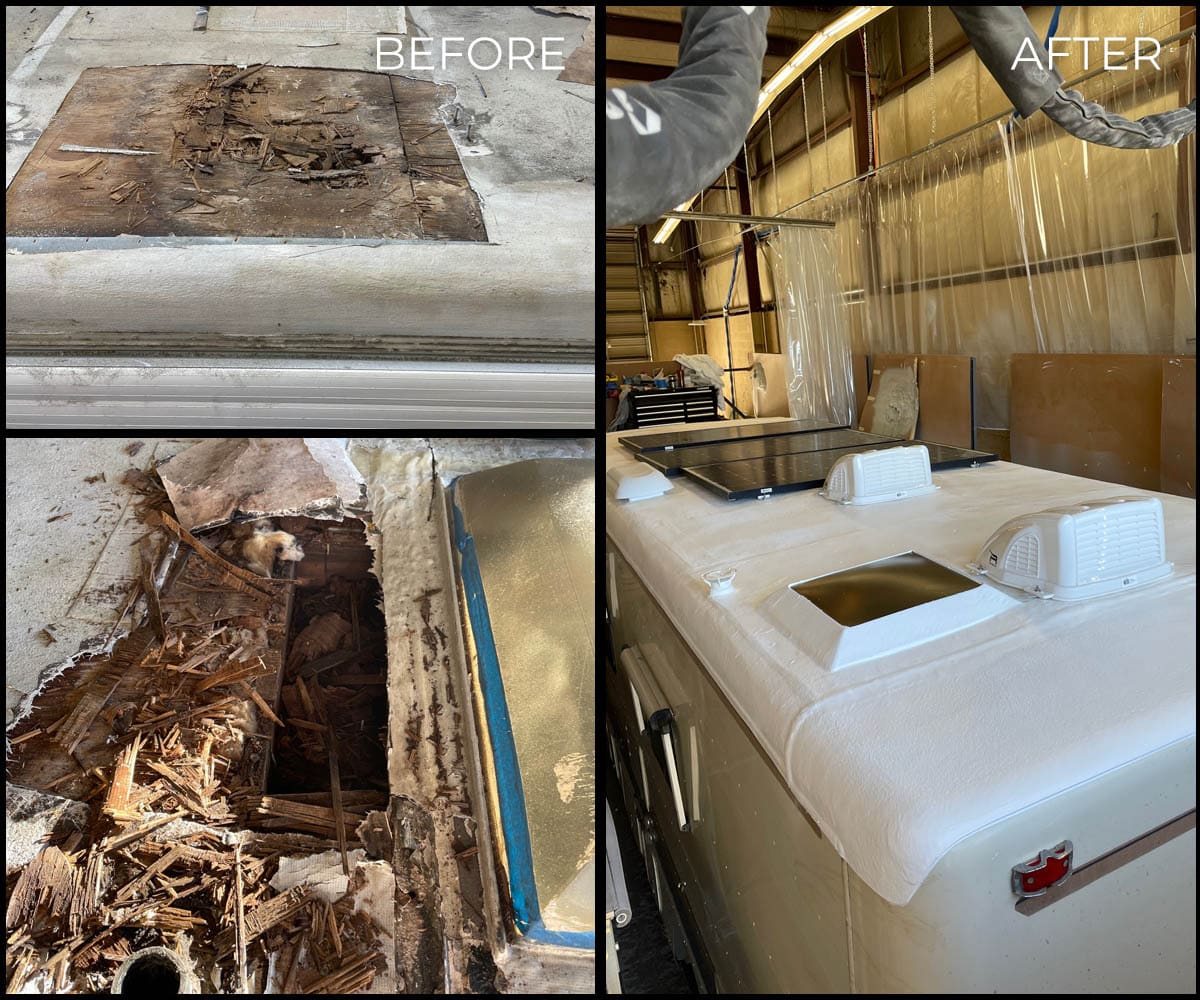
Fractures in the EPDM roof covering at side of camper (Repair Rv Roof Leak Walnut). An old spot work on the motor home rubber roofing system. Tons of caulk stacked over old issue areas. As you can see, this roofing system has actually had a great deal of concerns over the years. Looking from the within the camper there have clearly been leakages in several areas of the roof.
I grabbed an energy knife and began slicing. The first thing I noticed is that there were 2 layers. On the bottom is the original EPDM rubber roofing layer. I recognize it's EPDM rubber and not TPO rubber since of the black backing. (TPO roof is white on both sides.) In addition to my EPDM roofing system is a thin recreational vehicle roof finishing that was used later on.
Rubber Roofing For Rv Walnut, CA
I just left the roofing system layer stuck to the EPDM roof covering and drew them up together. (You don't require to peel them up individually.) Starting to peel off roofing system finishing. Peeling up section of the bottom layer of rubber. This shows that the initial motor home roof covering was EPDM as a result of the black backing.
I reduced lines with an utility knife around fixtures. All rubber roof covering gotten rid of from camper. This action went rather quickly. There was an adhesive under the bottom layer of rubber that was still quite well embeded several places, but with a great little bit of force it peeled up easily.
If you believe you'll be saving the roofing system decking plywood (not changing it), after that you may conserve yourself some clean-up trouble by removing the components initially and then peeling up the rubber! More water damaged locations on Recreational vehicle roof decking.
Rv Roof Replacement Walnut, CA
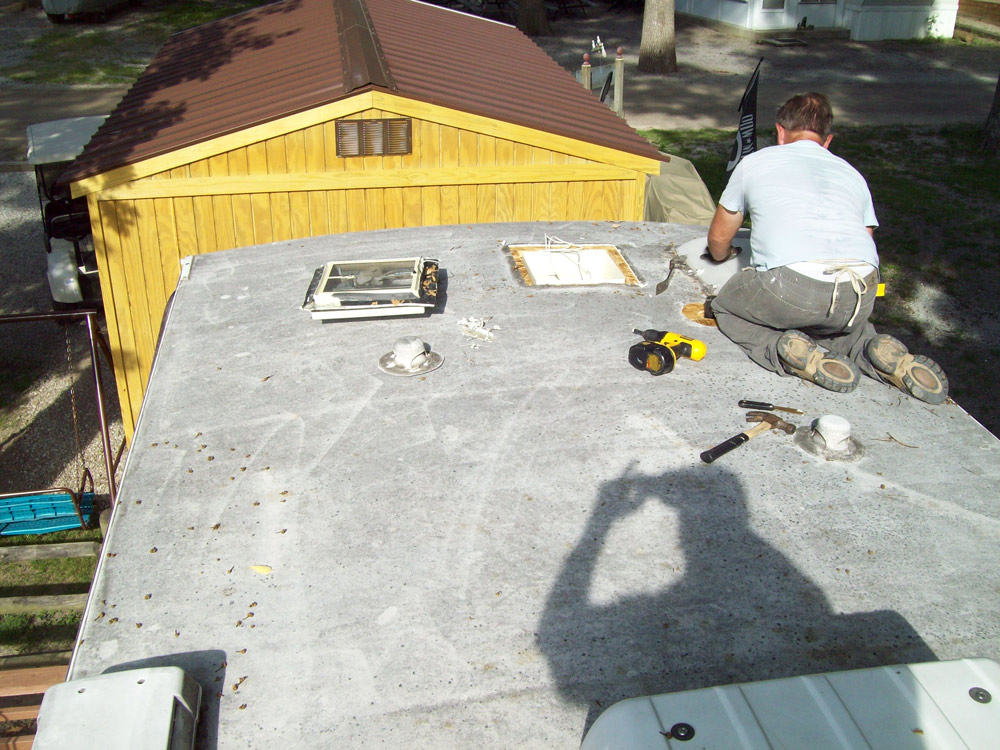
I opted for the most basic one initially, a vent cap from a kitchen area sink pipes vent pipe. Beginning to scratch caulk and sealant. I used a stiff scraper with a chisel-like blade and simply began prying and breaking and scraping and hacking. There is nothing else method around this, you simply have to begin digging until you expose the screw heads.
Unscrewing the screws in air vent cap. The screws on this air vent cap were hex-head steel screws so I utilized a tiny outlet chauffeur to eliminate them.
I discovered an old wasp nest inside the air vent cover. This is a sight I'll possibly have to obtain utilized to, discovering the remains of animal habitation high and low. I spend a horrible great deal of my time developing great wildlife habitat in my backyard so I do not get offended when a creature picks to establish up home in my recreational vehicle.
Rv Roof Leak Repair Near Me Walnut, CA
Luckily nobody was home in this old nest so I just threw it. Maybe I'll place a display over it when replacing it. Which brings us to the next factor. You need to try not to harm these pieces (like air vent covers and caps) as you're removing the old caulk and sealant simply in instance you require to use them again.
My roofing system vent also had a vent cover over it. Beginning on the roofing air vent. Equipment revealed on roofing system air vent cap, the first nut came off tidy.
Screw is rotating. The fasteners on this recreational vehicle roofing system air vent cover were nuts on tiny bolts. The first one came off great with an expansion outlet set. The 2nd one just began spinning, suggesting the bolt was not repaired in place however turning in addition to the nut. Drag. A peek at the equipment holding back the roof air vent cover.
Repair Rv Roof Walnut, CA
I really did not have any great means to hold the bolt in location so rather I chose to saw via the screws with a reciprocating saw. Sawing through bolts on roof air vent cover. I made use of a cordless reciprocating saw with a metal-cutting blade but it was tricky to get the blade level sufficient to get to the bolts so close to the roofing deck.
Bending the blade a little bit to get to close to the roof covering deck. Cover eliminated from roofing air vent.
A lot of were so old and rusted that they sheared off when I unscrewed then with a great deal of force. Loosening the braces that held the air vent cover in location. I scraped extra caulk and roof sealant off the flange of the roof vent itself. I quickly uncovered there disappeared screws or equipment holding it down so I quit on the scraping and went inside the motor home After scratching the caulk and sealant from flange of roof covering vent, no even more screws! Loosening the within cover plate of roofing system air vent follower in motor home bathroom.
Class C Rv Roof Repair Walnut, CA
A couple sheared off with a great deal of pressure, yet 2 wouldn't budge. I had to pierce out the screw heads. I chose a drill little bit close to the size of the shaft of the screws that I had actually already taken out and began boring. Picking a drill bit for piercing out a screw head.
Instead of popping off the screw head, the plastic just thawed away around the warm screw head. Hope I do not have to recycle this cover.
When the brackets were out I went back up top to tear out the the roof covering air vent. There are two cords running to the roof covering vent (a black warm cord and a white neutral cable) that you'll require to clip to remove the old air vent (Repair Rv Roof Leak Walnut).
Epdm Rv Roof Repair Walnut, CA
These are the wires connecting the roof covering airing vent follower. Roofing vent gotten rid of and cleansed up. After clipping the cable and getting rid of the air vent, I cleaned up any type of staying goop and got my very first good look at the roofing system structure.
Some Recreational vehicle roofs are framed with wood, others have steel framework. I scuffed off some rust and made a big mess inside the bathroom.
Oops. Maybe I need to have put a tarpaulin down initially. My final goal of the day was to obtain the refrigerator air vent cover off. I noticed recreational vehicle sealer balls at 4 points on the cover so assumed there need to be screws under them. I tore them up and discovered Phillips screw heads.
Exposing the screws in the fridge air vent cap. Peeling off old RV roof covering layer in addition to refrigerator air vent cap I likewise noticed that there was a layer of recreational vehicle roof covering covering over the air vent cap. These finishings are repainted on with a brush so plainly whoever did this covering simply blobbed know top of whatever.
Epdm Rv Roof Repair Walnut, CA
Taking off the cover of the refrigerator roof covering air vent. When the cap is off it's even more of the exact same. Removing much more rubber and removing recreational vehicle roofing sealer and old caulk. Obtain comfy due to the fact that this sucker has 32 screws in it! Ugh. Scraping lap sealer and caulk from screw heads.
Some screws will certainly be too rusted and require pliers to remove. Prying off the refrigerator roof vent nevertheless screws are gotten rid of. (and the tools used.) Almost every screw was in adequate problem to remove with a socket chauffeur, but a couple were as well rusty and required to be twisted out with vice hold pliers.
Rv Roof Leak Repair Walnut, CA
I peeled off the continuing to be rubber roofing system from under the flange and then scratched off the old putty beneath. Scuffing off the old putty from the flange of the refrigerator roofing system vent.
That's as much as I got on day 1 after concerning 5 hours of lazy work. Over time, your Motor home's roofing system can come to be used, harmed, or create leaks, which can compromise its stability and lead to more substantial issues. If you're experiencing any of these issues, it may be time to think about replacing your Motor home roofing.
There are numerous indicators that suggest your RV calls for a roof covering substitute. These indications consist of water leakages, sagging or soft spots on the roofing, fractures or divides in the roofing product, extreme wear and tear, and noticeable sunshine coming with the roofing. If you observe any one of these indications, it is important to address them promptly to stop additional damages to your motor home.
Rv Rubber Roof Replacement Cost Walnut, CA
On standard, Motor home roofing substitute prices can vary from $2,000 to $10,000. When choosing a Motor home roofing product, numerous aspects come right into play.
Choosing between a diy (DO IT YOURSELF) strategy or professional installment for your recreational vehicle roof covering substitute relies on your abilities, experience, and available time. While do it yourself installation can conserve you cash, it calls for ample understanding and expertise to guarantee a proper and watertight installation. On the other hand, expert installment offers the benefit of proficiency, experience, and service warranties.
Evaluate and clean up the seamless gutters and downspouts to guarantee proper drainage and prevent water merging on the roofing system. Apply a safety layer or sealer to the roof covering surface as advised by the producer. This can supply additional UV protection and assistance prolong the life of the roof. Prevent strolling on the roofing system unless needed.
The price of setting up a Motor home roofing system can differ based on aspects like Motor home dimension, chosen roof covering product, and whether specialist setup is asked for. If your Motor home's roof covering is damaged, used out, or dripping, a roof replacement is typically needed to make certain the architectural honesty of your RV.
Motorhome Roof Replacement Walnut, CA
Repairing a hole in a motor home roofing relies on the extent and sort of roof material. For small splits, you can use roof covering repair service tape or sealer particularly developed for RV roofing systems. Larger rips may require patching with a suitable roof material or seeking expert support. Recreational vehicle roof covering coatings can supply extra security and prolong the life-span of your roofing.
Purchasing a top notch recreational vehicle roof finish can be worth it for lasting roof covering maintenance. Flex Seal items are often utilized as momentary or quick-fix services for little leaks or cracks. While they may supply a short-lived service, it's recommended to seek advice from with an expert and utilize correct recreational vehicle roofing fixing products for a more permanent and trustworthy solution.
Rv Trailer Roof Repair Walnut, CA
PVC roofings provide exceptional durability, resistance to UV rays, and reduced upkeep needs. They are taken into consideration a reliable alternative for RV roof coverings, but the best selection depends on your particular requirements and preferences.
Resealing your recreational vehicle roofing need to be done frequently to preserve its integrity and protect against leakages. As a basic guideline, it's advised to reseal your recreational vehicle roofing at the very least annually or according to the maker's recommendations. Whether to leave your RV slides in or out depends upon the situation and personal preference.
Motor home roof leakages are relatively typical due to numerous variables such as age, wear and tear, inappropriate upkeep, or serious climate problems. The decision to amount to a Recreational vehicle due to water damages depends on the degree of the damages and the insurance policy firm's analysis.
Rv Trailer Roof Repair Walnut, CA
Insurance policy protection for motor home delamination depends on the particular plan and the source of delamination. It is essential to examine your insurance coverage and seek advice from with your company to recognize the insurance coverage for delamination and any type of applicable deductibles. Claiming water damage on a camper depends upon your insurance coverage and the scenarios bordering the water damage.
Rv Roof Repair Service Near Me Walnut, CAResealing Rv Roof Walnut, CA
Rv Rubber Roof Replacement Walnut, CA
Rubber Roof For Rv Walnut, CA
Rv Roof Repair Fiberglass Walnut, CA
Rv Roof Leak Repair Near Me Walnut, CA
Rv Roof Repair Service Near Me Walnut, CA
Resealing Rv Roof Walnut, CA
Rv Rubber Roof Maintenance Walnut, CA
Repair Rv Roof Walnut, CA
Replace Rv Roof Walnut, CA
Rv Rubber Roof Replacement Cost Walnut, CA
Rv Roof Repair Service Near Me Walnut, CA
Rubber Roof Installation Walnut, CA
Rv Rubber Roof Maintenance Walnut, CA
Motorhome Roof Replacement Walnut, CA
Repair Rv Roof Walnut, CA
Rubber Roofing For Campers Walnut, CA
Repair Rv Roof Walnut, CA
Epdm Rv Roof Repair Walnut, CA
Rv Roof Repair Near Me Walnut, CA
Motorhome Roof Replacement Walnut, CA
Rv Roof Repair Walnut, CA
Rv Slide Out Roof Repair Walnut, CA
Rv Fiberglass Roof Repair Walnut, CA
Repair Rv Roof Walnut, CA
Rubber Roofing For Rv Walnut, CA
Rv Roof Repair Walnut, CA
Class C Rv Roof Repair Walnut, CA
Rubber Roof Installation Walnut, CA
Resealing Rv Roof Walnut, CA
Rv Rubber Roof Repair Walnut, CA
Rv Trailer Rubber Roof Repair Walnut, CA
Rv Roof Repair Walnut, CA
Rv Trailer Roof Repair Walnut, CA
Rubber Roof For Rv Walnut, CA
Motorhome Roof Replacement Walnut, CA
Resealing Rv Roof Walnut, CA
Rv Rubber Roof Repair Walnut, CA
Motorhome Roof Replacement Walnut, CA
Best Rv Roof Repair Walnut, CA
Rv Rubber Roof Maintenance Walnut, CA
Roof Repair For Rv Walnut, CA
Replace Rv Roof Walnut, CA
Rv Fiberglass Roof Repair Walnut, CA
Rv Trailer Roof Repair Walnut, CA
Rubber Roof For Camper Walnut, CA
Rv Fiberglass Roof Repair Walnut, CA
Rv Rubber Roof Repair Walnut, CA
Repair Rv Roof Leak Walnut, CA
Rv Roof Replacement Walnut, CA
Rv Roof Leak Repair Near Me Walnut, CA
Rv Rubber Roof Replacement Walnut, CA
Rv Roof Repair Near Me Walnut, CA
Rv Roof Leak Repair Near Me Walnut, CA
Rubber Roof Installation Walnut, CA
Rv Rubber Roof Repair Walnut, CA
Roof Repair For Rv Walnut, CA
Replace Rv Roof Walnut, CA
Rv Rubber Roof Repair Walnut, CA
Rv Roof Repair Service Near Me Walnut, CA
Class C Rv Roof Repair Walnut, CA
Rv Roof Repair Walnut, CA
Rv Slide Out Roof Repair Walnut, CA
Rv Roof Repair Fiberglass Walnut, CA
Rubber Roofing For Campers Walnut, CA
Best Rv Roof Repair Walnut, CA
Epdm Rv Roof Repair Walnut, CA
Rv Trailer Roof Repair Walnut, CA
Rv Rubber Roof Repair Walnut, CA
Rv Slide Out Roof Repair Walnut, CA
Rubber Roofing For Campers Walnut, CA
Rv Roof Leak Repair Near Me Walnut, CA
Rv Roof Repair Service Near Me Walnut, CA
Rv Slide Out Roof Repair Walnut, CA
Rubber Roof Installation Walnut, CA
Rubber Roof Installation Walnut, CA
Rv Roof Maintenance Walnut, CA
Close To Seo Specialist Walnut, CA
Close By Seo Services Near Me Walnut, CA
OCRV Center
Table of Contents
- – Rubber Roofing For Campers Walnut, CA
- – OCRV Center
- – Rubber Roofing For Rv Walnut, CA
- – Rv Roof Replacement Walnut, CA
- – Rv Roof Leak Repair Near Me Walnut, CA
- – Repair Rv Roof Walnut, CA
- – Class C Rv Roof Repair Walnut, CA
- – Epdm Rv Roof Repair Walnut, CA
- – Epdm Rv Roof Repair Walnut, CA
- – Rv Roof Leak Repair Walnut, CA
- – Rv Rubber Roof Replacement Cost Walnut, CA
- – Motorhome Roof Replacement Walnut, CA
- – Rv Trailer Roof Repair Walnut, CA
- – Rv Trailer Roof Repair Walnut, CA
- – OCRV Center
Latest Posts
Placentia Truck Repair Services Near Me
Business Fleet Services Brea
Wheelchair Accessible Van Repair Atwood
More
Latest Posts
Placentia Truck Repair Services Near Me
Business Fleet Services Brea
Wheelchair Accessible Van Repair Atwood