All Categories
Featured
Table of Contents
- – Rv Plumbing Repair Near Me Irvine, CA
- – OCRV Center
- – Full Service Rv Repair Near Me Irvine, CA
- – Rv Floor Repair Near Me Irvine, CA
- – Motorhome Repair Service Irvine, CA
- – Rv Repair In My Area Irvine, CA
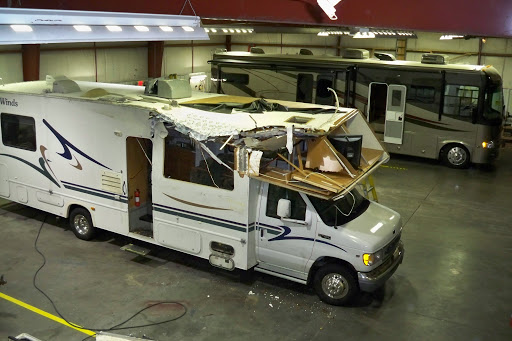
- – Rv Delamination Repair Near Me Irvine, CA
- – Rv Ceiling Repair Irvine, CA
- – Rv Solar Installation Irvine, CA
- – Rv Repair Centers Near Me Irvine, CA
- – Motorhome Repair Service Irvine, CA
- – Motorhome Generator Repair Near Me Irvine, CA
- – Motorhome Generator Repair Near Me Irvine, CA
- – OCRV Center
Rv Plumbing Repair Near Me Irvine, CA
We service and repair most significant parts including LP Gas, electrical and plumbing parts. We are a fully licensed and guaranteed repair work store accepting insurance coverage and guarantee insurance claims. Pertain to the Northern Virginia recreational vehicle expert. We utilize the very best high quality substitute components to get you back when driving safely and stylishly.
Count on our experienced service technicians to deal with any kind of internal or external system. Camp Ground Mobile Home Park Car Dealership (Pre-purchase Assessment) On the Side of the Roadway Anywhere You May Be Within Our Service Location is an additional of our specialties.
Our goal is to offer the very best motor home services readily available at inexpensive costs. Happy to introduce we currently offer RV sales & consignment. We are currently constructing our stock, however we can assist you if you are trying to sell your unit. We have the ability to provide consignment sales. Offer us a call and we can aid you out.
Full Service Rv Repair Near Me Irvine, CA
I will utilize Motor home Repair Bear again. They took the Motor home right in and serviced every little thing while I waited as promised.
Prices was practical and as priced estimate. I will definitely be back for maintenance in the future. Center of winter months. Snowy conditions. The heating system in my old Toyota motorhome stopped on me. Not just did they make time within 48 hours to check out it and detect it, transforms out they had the old board in supply! Repaired in 4 hours.
Used these individuals for the initial time for a pair of emergency situation repairs. It is really challenging to locate an excellent RV mechanic and we will absolutely be back.
Valid only at getting involved Outdoor camping Globe places. See supplier for information. Federal government charges, state taxes, dealer costs and exhausts testing costs as suitable will certainly be added to comply with state vehicle codes.
Rv Floor Repair Near Me Irvine, CA
Requirements, tools, technological data, photos and illustrations are based on details readily available at time of uploading and are subject to change without notification. Inventory and floorplans vary by location, not all promoted manufacturers readily available at participating dealers.
Might not be incorporated with any kind of other offer and not appropriate to prior sales. Deal( s) legitimate at any kind of Outdoor camping Globe Motor Home Sales or FreedomRoads dealer just. See dealer for details.
Decision to sell a RV no matter of cost is entirely established by the selling dealer. * Best offer or $1,000 - deal should be in writing and gotten from a qualified Motor home supplier.
Motorhome Repair Service Irvine, CA
To receive ensured trade-in worth and/or evaluation, car needs to be in same or substantially the exact same problem it was in at time of deal. All deals are subject to examination.
Customer has to provide legitimate purchasers order authorized by monitoring of competing dealer and proper documents describing design year, make, brand, model, choices, specifications, colors, and vin # of promoted device. Purchasers order legitimate for thirty days from time of write. Competing dealer will certainly be any type of certified motor home dealer as identified by the State in which the dealership runs and is not a Camping World RV Sales or FreedomRoads dealership.
Any type of relevant trade-in has to be disclosed and provided for evaluation at time of demand. Not appropriate to previous sales. See dealership for information. Not legitimate in The golden state. Space where banned. For official Grand Style motor home discount terms and problems, please browse through .
Rv Repair In My Area Irvine, CA
Thrill-seeker Kalen Thorien really feels most in your home when she's checking out off the grid in a RV. With a a Class B campervan, she awakens to brand-new sights and experiences, throughout the globe, no inquiries asked, all the time and she wouldn't desire it any kind of other way. Learn why van living is her excellent travel technique, and get inspired for your very own trip.
High quality, value, and technology are the core values that have actually belonged of the Gulf Stream Train means of operating considering that it was founded in Nappanee, Indiana, by Jim Shea and his kids (Irvine Rv Delamination Repair Near Me). Today Gulf Stream Train is the market's leading family-owned, family-operated recreational vehicle manufacturer, includes 22 brand names with over 140 different versions all brought to you by the most dedicated and seasoned group of affiliates in the market
Making use of residential-style studs, rotated fiberglass insulation, and light weight aluminum house siding for time-honored sturdiness and economic climate, in sizes from 20 ft. to 41 ft., our Main Line trailers are for devoted RVers that recognize what they desire and identify top quality. Ideal for first-timers, value-oriented, and laid-back campers, incorporating cost-effective pricing with rugged yet light-weight go-anywhere building.
This site uses cookies to assist personalise web content, tailor your experience and to keep you logged in if you register. By continuing to utilize this website, you are consenting to our use cookies.
Rv Delamination Repair Near Me Irvine, CA
( Announcer: Female Voice) Utilize the new insurance claim email you obtained or log in to your State Farm account to choose your service center. (Image) A symbol of a hand holding money is seen. (Commentator: Women Voice) When the repair is full, you'll pay your insurance deductible to the shop and State Farm will certainly deal with the remainder.
Provides even more adaptability with accessibility to a smaller sized, second car for discovering and more space. Provides the most effective rent-and-go alternative and allows for simpleness when it pertains to establishing camp, just move the RV into park.
I satisfied Jason of Quick Pro RV while he was repairing one more campers RV awning at Oak Hill Alabama State Park. I had a problem with my motorhome slide out. He claimed he would certainly be glad to look at it right after he completed his awning repair work task. He walked to my camper and aided me diagnose the trouble.
Rv Ceiling Repair Irvine, CA
After watching and listening to him work on the other camper, and afterwards mine, I would highly recommend him for any solution work you may need on you motor home. Before today, I did not know him, and now I rejoice he is easily accessible around this location of Birmingham, Pelham, and Hoover Alabama.
From rewards to destinations, security, emergency clinical assistance, and special savings, we have our members covered for the experience ahead.
Offered to qualified customers based upon lending institution credit qualifications. Legitimate just at getting involved CAMPING globe locations. See dealer for details. Space where restricted. Rates are comprehensive of all offered discount rates. Federal government fees, state taxes, supplier fees and emissions testing fees as applicable will be included to follow state automobile codes.
Specifications, devices, technical data, pictures and pictures are based on info available at time of posting and are subject to alter without notification. Irvine Rv Delamination Repair Near Me. Stock and floorplans differ by area, not all advertised manufacturers readily available at participating suppliers.
Rv Solar Installation Irvine, CA
Might not be combined with any kind of various other offer and not suitable to prior sales. Deal( s) legitimate at any kind of Outdoor camping World Recreational Vehicle Sales or FreedomRoads dealership just. See dealer for information. 2025 FreedomRoads, LLC. CAMPING globe and the Outdoor Camping WORLD Logo are signed up trademarks of CWI, LLC. and made use of with authorization.
All rights reserved. FreedomRoads LLC, its related dealerships and modern technology companions are exempt for mistakes in rate or mistakes in summary of problem of a car's listed equipment, accessories, price or warranties. Any and all differences have to be resolved before the sale of this vehicle. Choice to sell a recreational vehicle no matter rate is exclusively determined by the marketing dealership. * Ideal deal or $1,000 - offer has to remain in writing and gotten from a certified RV supplier.
Rv Repair Centers Near Me Irvine, CA
To get assured trade-in worth and/or evaluation, vehicle must be in same or significantly the very same problem it was in at time of deal. All offers are subject to inspection.
Client must present legitimate customers order authorized by administration of competing dealership and proper documentation detailing model year, make, brand name, design, options, specifications, shades, and vin # of advertised system. Purchasers order legitimate for 1 month from time of write. Competing dealer will certainly be any kind of qualified RV dealer as recognized by the State in which the dealership runs and is not an Outdoor Camping World Recreational Vehicle Sales or FreedomRoads dealer.
Motorhome Repair Service Irvine, CA

Any type of suitable trade-in needs to be revealed and attended to assessment sometimes of demand. Not relevant to prior sales. See supplier for details. Not legitimate in The golden state. Void where prohibited. For main Grand Layout recreational vehicle refund terms, please go to .
Brady has actually been serving our Recreational vehicles for several years. He is sincere concerning his expertise and is hardly ever without a solution. If he is not certain, he goes straight to the source so he can address your question. A pair of times he has preformed miracles and appears to have a hat filled with bunnies in his truck.
My refrigerator just recently quit and he once more informed me what to search for. I had him replace an a/c. He was having an extremely bad day. He really did not do his research, and left the location a mess since he had other visits. The air conditioner was not devoured, and he didn't call back to end up the work.
What are the most assessed rv repair work near me? A few of one of the most reviewed motor home repair near me are:
Motorhome Generator Repair Near Me Irvine, CA
I met Jason of Quick Pro Recreational Vehicle while he was fixing another campers RV awning at Oak Mountain Alabama State Park. He said he would certainly be delighted to look at it right after he finished his awning repair work task.
After enjoying and listening to him deal with the various other camper, and after that mine, I would extremely advise him for any kind of solution job you might require on you RV. Prior to today, I did not understand him, yet now I am thankful he is accessible around this area of Birmingham, Pelham, and Hoover Alabama.
(/ services/lighting-installation) Restore the power and efficiency of your RV's water system with our expert water pump repair work solutions. We'll swiftly diagnose and take care of any issues, obtaining your Motor home back on the roadway in no time. Easy Motor Home Water Pump Substitute Your Recreational vehicle's water pump is important for your convenience and convenience.
Motorhome Generator Repair Near Me Irvine, CA
Get your motor home microwave up and running once more with our specialist installment services. We'll take care of the whole process, from eliminating the old system to properly incorporating the new one. You'll have a fully practical microwave that makes recreational vehicle life a lot more practical - so you can concentrate on the experience in advance.
When it involves keeping your recreational vehicle in peak problem, Burton Campers Inc. is the relied on provider for recreational vehicle owners throughout Calera, Birmingham, Tuscaloosa, and Montgomery. Our knowledgeable service technicians are committed to ensuring that your motorhome or trailer stays prepared for the open road. Whether it's routine upkeep or facility fixings, we've obtained you covered! Owning a RV is a financial investment that supplies the flexibility you require to travel confidently.
Expert upkeep makes sure that your recreational vehicle stays safe and features at its finest. Whether you're dealing with issues with the roofing, devices, slide-outs, or awnings, timely service by knowledgeable specialists can aid prevent little issues from becoming significant, pricey repairs. At Burton Campers, we make use of industry-leading methods and high-quality components to keep your motor home doing ideally.
OCRV Center
Address: 23281 La Palma Ave Yorba Linda, CA 92887Phone: (714) 909-1444
Email: art@ocrvcenter.com
OCRV Center
sticks out in the RV solution sector for several crucial reasons. With over 100 years of mixed experience, our group of trained specialists is furnished to handle every one of your recreational vehicle service requirements. We concentrate on keeping Jayco Recreational vehicles and use warranty repair services, so you can feel confident that your investment is in capable hands.
Rv Service And Repair Near Me Irvine, CAMotorhome Awning Repair Irvine, CA
Motorhome Refrigerator Repair Irvine, CA
Rv Generator Repair Irvine, CA
Rv Solar Panel Installation Irvine, CA
Motorhome Service And Repair Near Me Irvine, CA
Motorhome Awning Repair Irvine, CA
Motorhome Repair Shop Irvine, CA
Rv Service And Repair Near Me Irvine, CA
Motorhome Repair Near Me Irvine, CA
Motorhome Repair Near Me Irvine, CA
Motorhome Generator Repair Near Me Irvine, CA
Camper Ac Repair Near Me Irvine, CA
Rv Repair Services Near Me Irvine, CA
Rv Mechanics Near Me Irvine, CA
Rv Repair Shops Near My Location Irvine, CA
Motorhome Repair Shops Irvine, CA
Motorhome Repair Shop Irvine, CA
Full Service Rv Repair Near Me Irvine, CA
Rv Repair Centers Near Me Irvine, CA
Motorhome Repair Near Me Irvine, CA
Motorhome Repair Shops Irvine, CA
Motorhome Awning Repair Irvine, CA
Rv Mechanics Near Me Irvine, CA
Rv Repair And Service Near Me Irvine, CA
Rv Repairs Near Me Irvine, CA
Rv Refrigerator Repair Near Me Irvine, CA
Rv Repair And Service Near Me Irvine, CA
Motorhome Repair Service Irvine, CA
Motorhome Repair Shops Irvine, CA
Motorhome Repair Shop Irvine, CA
Rv Service Repair Near Me Irvine, CA
Motorhome Refrigerator Repair Irvine, CA
Rv Solar Installation Irvine, CA
Rv Repair Places Near Me Irvine, CA
Camper Ac Repair Near Me Irvine, CA
Motorhome Repair Shops Irvine, CA
Rv Repair In My Area Irvine, CA
Rv Solar Panel Installation Irvine, CA
Rv Floor Repair Near Me Irvine, CA
Rv Repair Centers Near Me Irvine, CA
Rv Floor Repair Near Me Irvine, CA
Rv Generator Repair Irvine, CA
Camper Ac Repair Near Me Irvine, CA
Rv Service And Repair Near Me Irvine, CA
Rv Refrigerator Repair Near Me Irvine, CA
Rv Solar Installation Irvine, CA
Motorhome Service And Repair Near Me Irvine, CA
Rv Repair Centers Near Me Irvine, CA
Rv Repair And Service Near Me Irvine, CA
Best Rv Repair Near Me Irvine, CA
Motorhome Repair Shops Irvine, CA
Motorhome Refrigerator Repair Irvine, CA
Rv Delamination Repair Near Me Irvine, CA
Full Service Rv Repair Near Me Irvine, CA
Rv Mechanics Near Me Irvine, CA
Rv Solar Panel Installation Irvine, CA
Rv Service And Repair Near Me Irvine, CA
Motorhome Awning Repair Irvine, CA
Rv Service And Repair Near Me Irvine, CA
Motorhome Repair Shops Irvine, CA
Rv Generator Repair Irvine, CA
Rv Mechanics Near Me Irvine, CA
Rv Generator Repair Irvine, CA
Rv Repair Shops Near My Location Irvine, CA
Rv Ceiling Repair Irvine, CA
Motorhome Repair Shops Irvine, CA
Rv Repair Centers Near Me Irvine, CA
Rv Service And Repair Near Me Irvine, CA
Rv Refrigerator Repair Near Me Irvine, CA
Motorhome Repair Service Irvine, CA
Rv Repair And Service Near Me Irvine, CA
Rv Service Repair Near Me Irvine, CA
Full Service Rv Repair Near Me Irvine, CA
Rv Service Repair Near Me Irvine, CA
Rv Mechanics Near Me Irvine, CA
Rv Service Repair Near Me Irvine, CA
Motorhome Service And Repair Near Me Irvine, CA
Finding A Good Local Seo Services For Small Business Irvine, CA
Close To Me Seo Citations Irvine, CA
OCRV Center
Table of Contents
- – Rv Plumbing Repair Near Me Irvine, CA
- – OCRV Center
- – Full Service Rv Repair Near Me Irvine, CA
- – Rv Floor Repair Near Me Irvine, CA
- – Motorhome Repair Service Irvine, CA
- – Rv Repair In My Area Irvine, CA
- – Rv Delamination Repair Near Me Irvine, CA
- – Rv Ceiling Repair Irvine, CA
- – Rv Solar Installation Irvine, CA
- – Rv Repair Centers Near Me Irvine, CA
- – Motorhome Repair Service Irvine, CA
- – Motorhome Generator Repair Near Me Irvine, CA
- – Motorhome Generator Repair Near Me Irvine, CA
- – OCRV Center
Latest Posts
Travel Trailer Floor Repair Placentia
Custom Rv Paint Jobs La Habra
Mira Loma Web Design Agency
More
Latest Posts
Travel Trailer Floor Repair Placentia
Custom Rv Paint Jobs La Habra
Mira Loma Web Design Agency