All Categories
Featured
Table of Contents
- – Camper Roof Repair Near Me Ontario, CA
- – OCRV Center
- – Camper Service Near Me Ontario, CA
- – Camper Repair Shop Near Me Ontario, CA
- – Camper Service And Repair Ontario, CA
- – Camper Roof Repair Ontario, CA
- – Camper Roof Repair Ontario, CA
- – Rv Camper Ac Repair Ontario, CA
- – Rv Camper Repair Near Me Ontario, CA
- – Pop Up Camper Repair Near Me Ontario, CA
- – Camper Awning Replacement Ontario, CA
- – Camper Trailer Repair Near Me Ontario, CA
- – OCRV Center
Camper Roof Repair Near Me Ontario, CA
nuCamp has actually been manufacturing teardrop trailers and small campers because 2004, which puts us in advance of the little living trend. Now is the perfect time to update from tent camping. Our small trailers, small campers, and pick-up vehicle campers are developed to go off the grid, permitting you to discover off the beaten path and take the roadway much less taken a trip.
Motivated by European influences, our campers include a modern-day appearance that will certainly capture everybody's eye. These small, portable campers let you bring the conveniences of home when driving without endangering on top quality. nuCamp's owner, Joe Mullet, has passionately cultivated a culture of genuine care for both our employee and the campers we craft for our cherished clients.
Camper Service Near Me Ontario, CA
Every solitary one of our campers is carefully handcrafted at our modern production facility in Sugarcreek, Ohio. Quality and client complete satisfaction are not just priorities, they are the significance of our work.
Gives even more flexibility with access to a smaller, additional vehicle for discovering and a lot more space (Rv Camper Repair Near Me Ontario). Gives the very best rent-and-go option and enables for simpleness when it concerns establishing up camp, simply change the recreational vehicle right into park
Consumer Service is at the core of RVRS! Our objective is to supply every client with the Courteous, Responsive, Personal interest they should have!
Camper Repair Shop Near Me Ontario, CA
I removed all of the camper logos. A fellow truck camper who additionally occurs to fly powered paragliders as a hobby, took pictures of my rig over Sandy Neck Beach (Rv Camper Repair Near Me Ontario). I re-sized his aerial images in Photoshop and added some text. After that I took them to my favored sign shop and had them made right into vinyl overlays.
Due to the size and my back troubles, I figured, allow the professionals do it. Anyhow, you be the judge of "Coastline Vehicle II"." "Two years back, I got rid of front vinyl graphics since they were discolored and spitting. We made use of a heat weapon and gradually warmed and peeled them off.
I do park it under a cover so it's not exposed to the components other than when we get on the road. I wax my camper two times a year. The hardest section to maintain clean is the front cap with the assault of insects while traveling. I'll off-load the camper in July (and once more in November) and reduced it to get to the front cap less complicated.
Camper Service And Repair Ontario, CA
After washing I'll place on a coat of West Marine Cleaner Wax and afterwards a coat of West Marine Fluid Wax. Then I'll make use of a power buffer to complete it. I've also utilized these items on my fiberglass cruise watercraft. Up until now it's working well to keep the Eagle Cap and the graphics are looking good." "We got rid of the initial sticker labels.
They did leave shadows behind which still show if you look very closely. We employed a graffiti artist in Rocky Factor, Mexico to paint custom-made designs on the sides of the camper. He utilized basic canned Rustoleum splashed with an airbrush. He clear coated the design. It has been virtually 2 years.
I disputed regarding having the camper covered yet the cost was approximately $1,000 more than having it re-striped. The business I made use of did an excellent job and I got a great deal of praises.
The left side's graphics are still in rather excellent form. The fiberglass was additionally milky and discolored. We had the nose art changed at Lance when we changed the water-damaged nose skin a few months back. Considering that then I have applied West Marine Fiberglass Conservator and Wax with a barrier to restore the fiberglass gloss.
Camper Roof Repair Ontario, CA
We do the very same to our 2017 Arctic Fox truck camper. "The only graphic that has actually had problems on our 2010 camper is on the nose of the camper.
The Adventurer visuals was changed at the factory as soon as. I have yet to find anything that really shields the front short of making use of a clear movie wrap.
We were told that it was currently fixed so along we went. By the following spring we understood it was not taken care of and had to throw down the gauntlet. We appreciated it for that summer season with the goal of doing something come loss. What began as a innocent task changed into a significant one.
I included new trim pieces and had a great close friend set up new plastic graphics. "I live in a 5th wheel and utilize the Lance for road trips.
Camper Roof Repair Ontario, CA
Goo Gone and a razor blade was used to eliminate the old graphics. They utilized a prep solvent that body stores make use of.
They duplicated this process for each graphic red stripe. "When I bought my new Lance 1050S in 2014, I got it without graphics for this extremely factor. I did obtain the Chevrons and the Lance names.
Rv Camper Ac Repair Ontario, CA
I don't mind the new Lance graphics. I didn't like the earlier graphics where they would put them over the home window. "After a hard and hectic summertime in Alaska in different weather condition, and camping in North Michigan, the exterior final graphics are still like brand brand-new requiring absolutely no attention.
Quality I can deal with without a doubt." "I have actually refrained anything with the graphics although they are fractured and faded. I had actually eliminated some on the back of the camper with a warmth gun and plastic razor blade, but then figured out that the visuals had actually shed into the fiberglass outside.
Rv Camper Repair Near Me Ontario, CA
"I keep my camper inside when not utilizing it in the summer. It's been claimed that waxing the graphics creates spotting and the wax is hard to remove.
I utilize Turtle Wax paste and it goes on and comes off easily. A fast telephone call to Palomino in Colon, Michigan got me a replacement in the mail.
I punched a hole in the camper nose regarding the size of my thumb when dumping the camper a number of years ago. I fixed the hole, however didn't wish to repaint it. Rather, I covered it with a sticker that I made from a fox that came on our patio area every early morning to sun himself.
Having a Arctic Fox camper, I placed his photo on front of it to cover up the hole I covered. I assumed I 'd spruce up the old Fox (camper) and had a larger one made which I place on side.
Pop Up Camper Repair Near Me Ontario, CA
The initial ahead off were those on the front cap since that is where the majority of the issues start. I peeled up a starting factor and heated them up with a hair dryer. They all came off really quickly because they were virtually new. There is less job included to maintain the exterior of the camper currently.
They tend to date a lorry swiftly, and at some point fade and peel off, making the entire device look worn. That pet peeve aside, I was able to keep the graphics on my 27 years of age Lance 480 looking fairly decent making use of a few preventative procedures. Initially, the sun is the best enemy, so saving the unit shady is the initial line of defense.
Something that merits some explanation or exploration is what I suggested to claim outside of the camper is this piece of trim right below. It was undoubtedly included for one reason or another and caulked improperly. So, I'm gon na take all of this off. I wan na look below there, see what encouraged somebody to place that on to begin with, and afterwards simply dual check to ensure there aren't any type of still existing conditions under there that require to be dealt with.
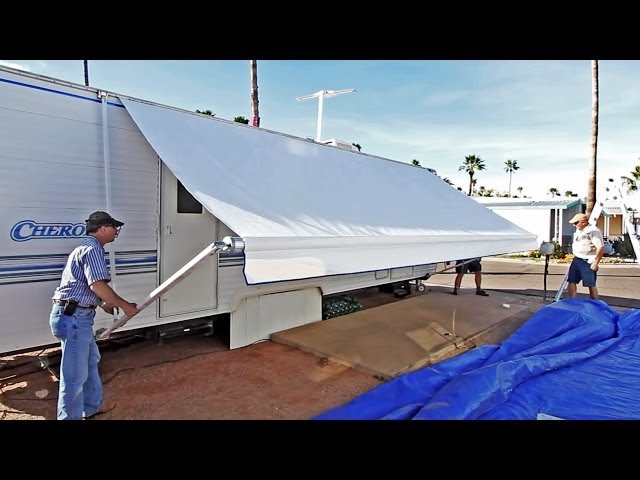
Camper Awning Replacement Ontario, CA
I have actually got all the screws out, there were concerning a bazillion of them. I am doing the work with a level bar, however the key to this is to use it like that, to slice the caulk totally free.
You do not desire anything sharp violating that light weight aluminum skin 'cause there's a chance you might permeate it and you're gon na create a larger issue. So I require to just keep functioning my way up. And certainly, on both sides. Act. There you go. And as soon as I have actually obtained that caulk cut, after that I'll have the ability to take this edge off and we'll see what's under there.
So I have actually obtained this peeled to a factor where this prepares to find off and check out inside there. Down here near the bottom, every little thing is strong as a rock. The wood corner that's inside there; up here, not so much. So it's gon na take a little expedition possibly from within in order to determine specifically how to deal with this top corner.
Camper Trailer Repair Near Me Ontario, CA
Remember, inside here, every one of this floor obtained changed, and what I pertained to figure out is that that was the problem. At one factor, the camper had a leakage coming in via there. Somebody tried to do some repairs, yet the lower line is I require to open this up to get that component taken care of.
One, I have actually marked on the wall surface where I wan na make cuts in order to open up this edge. And at this phase of the video game, this is type of like exploratory surgical procedure. I wan na primarily do as low as possible initial simply to see what's taking place below. And after that, if I need to open up the wall surface some much more, I will, however I would rather refrain that.

I marked that as a straight line since I'm gon na suffice directly as I can and that's gon na make it easier to patch back in. If you just enter here with a jigsaw or a Sawzall or something and cut it willy-nilly, after that I think it's gon na make it more difficult to obtain brand-new panels put back right into this.
OCRV Center
Address: 23281 La Palma Ave Yorba Linda, CA 92887Phone: (714) 909-1444
Email: art@ocrvcenter.com
OCRV Center
It's a cordless saw and it permits me to set the depth to cut so I recognize I'm gon na just barely permeate that paneling. That's gon na quit me from cutting stuff I do not wan na cut on the other side of the wall surface.
Camper Repair Shop Ontario, CACamper Repair Places Near Me Ontario, CA
Camper Repair Near Me Ontario, CA
Camper Service And Repair Ontario, CA
Camper Repair Places Near Me Ontario, CA
Camper Repair Places Near Me Ontario, CA
Camper Repair Places Near Me Ontario, CA
Camper Service And Repair Ontario, CA
Camper Repair Shops Near Me Ontario, CA
Camper Repair Shop Ontario, CA
Camper Repair Ontario, CA
Camper Repair Near Me Ontario, CA
Camper Services Ontario, CA
Camper Services Ontario, CA
Pop Up Camper Canvas Repair Ontario, CA
Rv Camper Ac Repair Ontario, CA
Pop Up Camper Canvas Repair Ontario, CA
Camper Service Center Ontario, CA
Camper Repair And Service Ontario, CA
Pop Up Camper Repair Ontario, CA
Camper Roof Repair Near Me Ontario, CA
Pop Up Camper Repair Ontario, CA
Camper Repair Ontario, CA
Camper Trailer Service Near Me Ontario, CA
Camper Repair Shop Near Me Ontario, CA
Pop Up Camper Repair Near Me Ontario, CA
Camper Repair Shop Near Me Ontario, CA
Camper Roof Replacement Ontario, CA
Rv Camper Ac Repair Ontario, CA
Camper Repair Near Me Ontario, CA
Camper Repair Ontario, CA
Rv Camper Repair Ontario, CA
Pop Up Camper Roof Replacement Ontario, CA
Camper Repair Shops Near Me Ontario, CA
Pop Up Camper Canvas Repair Ontario, CA
Camper Services Ontario, CA
Rv Camper Ac Repair Ontario, CA
Camper Repair And Service Ontario, CA
Pop Up Camper Roof Replacement Ontario, CA
Pop Up Camper Repair Ontario, CA
Camper Service Near Me Ontario, CA
Camper Repair Near Me Ontario, CA
Camper Air Conditioner Repair Near Me Ontario, CA
Camper Trailer Repair Ontario, CA
Camper Service And Repair Ontario, CA
Pop Up Camper Repair Near Me Ontario, CA
Camper Roof Repair Ontario, CA
Pop Up Camper Roof Replacement Ontario, CA
Camper Air Conditioner Repair Near Me Ontario, CA
Camper Services Ontario, CA
Camper Trailer Service Near Me Ontario, CA
Camper Repair Places Near Me Ontario, CA
Camper Service Center Ontario, CA
Camper Trailer Repair Near Me Ontario, CA
Camper Awning Replacement Ontario, CA
Camper Trailer Repair Near Me Ontario, CA
Pop Up Camper Repair Near Me Ontario, CA
Camper Service And Repair Ontario, CA
Camper Service And Repair Ontario, CA
Camper Service Center Ontario, CA
Camper Trailer Repair Near Me Ontario, CA
Camping Repair Near Me Ontario, CA
Pop Up Camper Roof Repair Ontario, CA
Pop Up Camper Repair Near Me Ontario, CA
Camper Repair Shops Near Me Ontario, CA
Camper Repair Ontario, CA
Rv Camper Repair Ontario, CA
Camper Repair And Service Ontario, CA
Camper Repair Near Me Ontario, CA
Camper Service And Repair Ontario, CA
Camper Repair Shop Near Me Ontario, CA
Rv Camper Repair Ontario, CA
Camper Repair Ontario, CA
Camper Service And Repair Ontario, CA
Camper Awning Repair Ontario, CA
Camper Services Ontario, CA
Camper Awning Replacement Ontario, CA
Rv Camper Repair Ontario, CA
Finding A Seo For Law Firms Ontario, CA
Find Seo Optimization Services Ontario, CA
Rv Camper Repair Near Me Ontario, CA
OCRV Center
Table of Contents
- – Camper Roof Repair Near Me Ontario, CA
- – OCRV Center
- – Camper Service Near Me Ontario, CA
- – Camper Repair Shop Near Me Ontario, CA
- – Camper Service And Repair Ontario, CA
- – Camper Roof Repair Ontario, CA
- – Camper Roof Repair Ontario, CA
- – Rv Camper Ac Repair Ontario, CA
- – Rv Camper Repair Near Me Ontario, CA
- – Pop Up Camper Repair Near Me Ontario, CA
- – Camper Awning Replacement Ontario, CA
- – Camper Trailer Repair Near Me Ontario, CA
- – OCRV Center
Latest Posts
Web Design Companies Pomona
Local Seo Company Rowland Heights
Legal Internet Marketing Eastvale
More
Latest Posts
Web Design Companies Pomona
Local Seo Company Rowland Heights
Legal Internet Marketing Eastvale